Troubleshooters.Com®, Linux Library, and T.C Void Linux Subsite Present:
Quick and Reliable Void Linux Installation
Copyright © 2017 by Steve Litt
See the Troubleshooters.Com Bookstore.
Contents:
- Introduction
- X/windowmanager Install
- Installing from Base System Install DVD
- Starting lxqt from startx
Introduction
Installing any operating system is slow, difficult, and often results in a no-boot OS requiring either chroot repair or redoing the instalation, neither of which are fun. This document shows two quick and reliable ways to install Void Linux:
- X/windowmanager install from X/windowmanager install DVD, and upgrade.
- Base install from base install DVD, upgrade, and build up from there.
#1 is best for the less experienced computer user who wants to quickly and easily and easily throw up an OS with a window manager with some typical desktop convenience for security tradeoffs. #2 is the quickest to get an independent OS up and running. It's ideal for a no-GUI computer, and is also a good way for the more experienced computer user to install a GUI system exactly how he likes it.
This document is valid only for Intel/AMD x86_64 versions of Void Linux compiled with GNU gcc. Perhaps another time I'll write similar documents for other hardware and other compilers, but for now, x86_64 compiled with GNU gcc covers a sizeable chunk of the Void-using public.
Don't judge the difficulty of this installation by the length of the checklists in this document. I've chosen to break out every single step so that it can be used as a checklist, and to prevent confusion. Some people glance at such a long checklist and assume it's going to be tedious, but in fact most of the steps identified in the checklists take 15-30 seconds if you're experienced at installations.
X/windowmanager Install
This section illustrates a very easy and sure fire way to install a GUI (LXQt in this example) Void Linux system. If you've never installed Void Linux before, I'd recommend this section as an easy example or proof of concept. You can always change things or reinstall later.
Installation Preliminaries
Choose, download and burn the x86_64 non-musl .iso from https://repo.voidlinux.eu/live/current/ that has your favorite window manager. For the example in this section I'll choose the LXQt DVD, the lastest of which was void-live-x86_64-20160420-lxqt.iso on 1/9/2017. Insert the DVD in the computer's DVD drive, and begin your installation by following the following checklist:
- Boot the DVD
- From the grub menu, choose Void Linux (followed by version #). You can choose the RAM version or not: The RAM version is probably slower for the purpose of installation.
- Watch as the computer does a bunch of mumbo jumbo, including a blank screen for awhile. After 15 seconds to a minute, you'll see the LXQt window manager interface with its bottom panel bar and its lower left start button.
- Startbutton->System_tools->qterminal
- Optional: On the terminal emulator (qterminal), adjust the font and background/foreground colors as desired.
- Optional: Fullscreen the terminal emulator.
- Begin using the terminal to type commands...
- sudo su - to become root.
- void-installer to enter the Void Linux installation program.
Specifying the Install
You're now in the nCurses installation program, observing a screen that resembles the following:

Read the screen, press Enter, and you'll be presented with the void_installer main menu, as follows:

The installation involves completing every choice on the preceding menu. Once you get used to it, completing the menu takes about 10 minutes, and the rest of the install takes 10 to 30, depending on computer speed.
- With highlight on
- With the highlight on , press Enter and choose your keyboard from the long list. If you live in the US and work only in English, it will be "us".
- With highlight on , press Enter, to be presented with the following Interface Menu screen:

Please be aware that your Interface Menu will look different and likely have more than one interface listed. - For each listed network interface you want to configure, highlight it, make sure there's also a highlight on the OK button, and press Enter to access its config screen, as follows:

- For simplicity, choose DHCP config. Assuming you have a working DHCP server on your subnet, you'll be told you have a working network connection and you can return to the main menu. Otherwise, you might need to manually config (say "no" to DHCP), which is doable by someone with some networking knowledge, but it beyond the scope of this document.
- Return to the main menu.
- On the Main Menu, highlight and , press Enter, pick "Local", and you'll be returned to the Main Menu.
- On the Main Menu, highlight, and put in one word.
- On the Main Menu, highlight, and choose from the long list. If you live in the United States and write only English, you'll probably select en_US.UTF-8. To reach it faster, you could type 'e' and then start using PageDown.
- On the Main Menu, highlight, and choose from the long list. Once again, letters and the PageDown key are your friends.
- On the Main Menu, highlight, and type in a password for the root user. You'll need to type it twice to check that you haven't made a typo. For gosh sakes, do whatever is necessary to remember it!
- On the Main Menu, highlight, and type in the username and password for the most frequent user. When it asks you to choose which groups the user belongs to, I suggest you leave the checked and unchecked groups as is and just highlight OK and press Enter.. DO NOT CHECK root!!! because that would be a horrendous security breach.
- On the Main Menu, highlight to be presented by the device list. An example with one possible disk device follows:

If your hardware has multiple disk devices, they'll all be listed here. - Highlight the disk device on which you want the bootloader installed. If you have multiple disks, choose the disk on which you intend to create the root partition. Once you've highlighted the right disk, press Enter to be presented with the following screen:

- I highly recommend you highlight and press Enter. In my opinion, graphics have no business in the boot process, and just make troubleshooting more difficult.
Let's discuss what's happened so far. You've answered almost all the questions needed for installation. All that's left is to partition the disk, install the proper filesystems, and let the installation run.
But partitioning and proper filesystems are the difficult part of an installation, so separate checklists are given for each.
Specifying the Partitioning
In the checklist for partitioning, I'll be presenting a very simple partitioning scheme, with /dev/sda1 as the swap partition, /dev/sda2 as the root partition, and no other partitions. Both of these partitions are primary partitions.
If possible, make the partitioning scheme for the boot drive be the old style MBR rather than the new GPT system. A GPT boot disk implies the EFI booting system, which is a huge traffic circle of data communication guaranteed to complexify everything. EFI boot systems have in the past been complicit in hardware damage, and there have been cases where people who erased their drive rendered their EFI-boot computer permanently unbootable. Compared to EFI boot, booting to an MBR partitioned disk yields a clean, modular system. The only reasons to use a GPT partitioning scheme on the boot drive are:
- The motherboard supports only EFI boot.
- You absolutely must have more than 3TB disk space on the boot drive.
- You absolutely must have more than 13 partitions on the boot drive.
On desktop systems with huge drives, I find it cost effective to have / (root partition) be on a small, cheap, small, MBR partitioned SSD disk, and have partitions like /home and /var directories on large, GPT formatted spinning disks. Please remember, GPT is a disadvantage only on the boot drive.
Many motherboards still support booting to MBR by setting something similar to "legacy boot" in the BIOS to True. In my opinion, as of January 2017, EFI boot is not ready for prime time, so try to buy motherboards that still support MBR booting.
NOTE:
GPT partitioning for non-boot disks is ready for prime time and probably preferable to MBR for many reasons. The only place you want MBR is on the drive getting booted, because a GPT disk can be booted only with EFI boot, and EFI boot is problematic.
The following checklist walks you through the partitioning.
- On the Main Menu, highlight and , and press Enter. You'll be presented with the disk list, and example of which follows:

- Highlight and press Enter. You'll be presented with the partition instruction screen as follows:

Read the instructions and then press Enter. - You'll be presented with the partition type chooser screen, as follows:

"dos" refers to an MBR partition. If you look at the preceding screenshot, you'll notice it's the cfdisk program: An excellent program for carving up disks. - Highlight and press Enter. The cfdisk program presents you with the following screen, to create and specify a new partition:

- With the upper highlight on the line and the lower highlight on the button, press Enter. You'll be presented with the following screen:

- Specify your desired swap partition size in gigabytes, by typing a number followed by an uppercase G (for GiB). Ideally it should be two times your RAM. You can use less if you have a lot of RAM, little disk space, and you don't care about hybernating your computer. In this example I use 2G, because my entire (Qemu) disk is only 6GB. When you've specified your desired size, press Enter.
- Now the program asks you whether you want this to be a primary or secondary partition. Highlight and press Enter. You'll be presented with the following screen:
- Highlight and choose Linux swap (82) from the list. You'll return to the previous screen, and notice that the partition type of /dev/sda1 has changed to swap.
- Highlight above and below, to specify /dev/sda2 in much the same way as /dev/sda1. Use the remainder of the disk for /dev/sda2, and specify it as a primary partition. You're returned to the specification screen, and has changed to .
- Highlight above and below, and specify type 83, Linux. You're returned to the specification screen.
- Highlight above and below, and notice that the /dev/sda2 row now has a star in the "bootable" column. The following image shows the screen with its two partitions, of which /dev/sda2 is bootable:

- IMPORTANT: You'll lose all your work if you don't put the lower highlight on and press Enter. Unless you have reason to believe there's a mistake, do that now.
- Highlight and press Enter. You'll be presented with the main menu of void-installer.
Now the partitioning is done, but you still need to format the partitions, and in the case of the root partition, you need to mount it as user root. Unlike the rest of the Void installation, the part of the installation contains some unexpected behavior. The following checklist walks you through creating filesystems on the partitions you've created:
Specifying Filesystems and Mountpoints
In the checklist for filesystem making, I'll be presenting a very simple formatting scheme, with /dev/sda1 formatted as swap, and /dev/sda2 formatted as Ext4 and mounted as the root partition, with no other mounted partitions. The reason I chose Ext4 is it's reliable, it has good tools, it's easy to use, and it always works.
The following is the checklist for specifying filesystems and mountpoints:
- Highlight the list item and the button, and press Enter. You'll be presented with the following screen:

- Highlight and and press Enter. You'll be presented with the following screen:

- Highlight and and press Enter.
- Tell the program you want to format /dev/sda1. You'll be brought back to the drive list.
- Highlight and and press Enter. You'll be presented with the filesystem type list again.
- Highlight and and press Enter.
- Tell the program you want to mount /dev/sda2 as / (root), and yes, you want to format it. You'll be brought back to the drive list.
- UNEXPECTED BEHAVIOR ALERT: The drive list has no "Done" button, only . "Back" sounds intuitively like you need to redo something, but in fact it's how you tell the drive list screen you're done. If you had highlighted pressed Enter, you'd have had to redo an entire filesystem specification.
UNEXPECTED BEHAVIOR ALERT: Note that even though during partitioning you gave the partitions types (Linux swap 82 and Linux 83), the preceding list screenshots lists the "type" for both partitions as "none". This is because the "type" in the preceding screen depends on the format type, not the partition type. Not only that, but the "type" in the preceding screenshot depends on the format type of the format as it exists right now. So even after you use this screen to declare one swap and the other Ext4, they'll still show as "none" unless you complete this step and go back into it.
Main Installation
- Highlight the button and press Enter. You'll be brought back to the Main Menu.
- UNEXPECTED BEHAVIOR ALERT: When you come back to the Main Menu, the highlight is on the choice, as if your previous trip through filesystem definitions had failed, even though you did everything right while defining filesystems. Unless you have a reason to believe you did something wrong within filesystem specification, you can move past the choice.
- Highlight the choice and the button. You're presented with a warning screen listing the partitions you're going to format. Look at it very carefully to make sure that yes, you do want to partition those partitions.
- If you're OK with formatting the partitions listed in the warning, highlight the button and press Enter.
- UNEXPECTED BEHAVIOR ALERT: Immediately after you pressed Enter on the preceding step, the nCurses program appears to go away, leaving only a terminal with the text "Syncing disks" at the bottom. The computer might stay in this state for several minutes, and you might get the idea that the process stalled. It probably didn't, it just leaves the screen in that state during the entire copy from DVD operation and other install activities. I'm a big believer in outputting enough to let the user know the process is still running, but I didn't write the installer. A few minutes later you're presented with the nCurses program again, saying "Void Linux has been installed successfully! Do you want to reboot your system?"
- Answer the question in the preceding question "No". Then highlight on the Main Menu, and the void-installer program finishes, leaving you at a command prompt as user root.
- Type the command poweroff. The computer shuts down cleanly.
- Do whatever's necessary to remove the DVD from the DVD drive. You might need to boot, get into the BIOS, and then press the drive button. Do what you have to. If you've installed in a virtual machine, change the command or shellscript or configuration so that the newly installed virtual guest boots to the hard drive.
- Boot the computer. If all went well, within 10 seconds to 2 minutes the computer boots into Void Linux OS with the LXQt window manager.
- Log in as the non-root user you installed, using the password you gave that user. If you can do this, with the DVD not inserted in the DVD drive (or the installation thumb drive not in a USB port), you've proven you installed a working Void system. Now it's time to upgrade and add programs...
Upgrade and Add Programs
If you can log in as the non-root user you installed, using the password you gave that user, it proves you have a working operating system. If you can su to user root using the root password during installation, your operating system is functional. The only trouble is, this OS is out of date, and not very secure.
Temporarily disable all sudo recipes
First thing first, get rid of any possible misuse of sudo by disabling all recipes in /etc/sudoers.. Run a terminal emulator, become root in that emulator by running su - and typing in the root password, make a backup copy of /etc/sudoers. (I suggest placing it in the /root directory, making sure it's owned by user root, group root, and making it chmod 400.
Now, to disable all recipes then run the program visudo, which is a special vi just for editing /etc/sudoers, and issuing the following commands:
- :%s/^/#/ Enter
- :wq Enter
Now somebody can't finagle their way into your non-root user and escalate to root using sudo. You can later use visudo again to enable your non-root user to do exactly what you want, but when doing so, please understand the security implications of your choices. For instance, it's possible for a person logging in as the non-root user to use sudo with the mount command to become root and completely control your computer. For the time being, just leave sudo powerless, with no recipes.
Upgrade
The OS you just installed is as up to date as the installation image you used to install it. For instance, I used ISO image void-live-x86_64-20160420-lxqt.iso, presumably made with an up-to-date installation from April 20, 2016. I did that on January 9, 2017. Not only is this installation insecure (because of security problems found and patched since April 20, 2016), but it's almost impossible to add new software because the new software depends on modern versions of its dependencies. So the first that needs doing, after getting rid of any possible sudo misuse, is to bring the OS up to date. Start by running the following command:
xbps-install -S
The preceding updates your computer's repository information. Now upgrade your software with the following command:
xbps-install -u
What the preceding command does depends on how out of date your install ISO was. If your install ISO image is old enough that the package manager itself has changed, the preceding command upgrades only the package manager. Otherwise, it upgrades all software. Typically, the install ISO image is old enough that the package manager has changed.
WARNING!
If you see any messages marked "Attention" or "Warning" or anything like that, do what they ask. If you don't understand them, get on the #voidlinux channel on Freenode.org to ask about it.
One "Attention" item you'll likely confront is one saying something like "There are currently problems with the update process if the sh alternative is not set to dash." It then gives a command to find out the current alternative, and another to change that alternative to dash. Run the one to change it to dash, and use the other one to check that it's set to dash. If the output of the checking command lists dash before any other alternatives, you've successfully changed it to dash. On my computer, setting it to dash yielded the following:
[root@mydesk etc]# xbps-alternatives -l -g sh
sh
 - dash (current)
  - sh:/usr/bin/dash
  - sh.1:/usr/share/man/man1/dash.1
 - bash
  - sh:/usr/bin/bash
  - sh.1:/usr/share/man/man1/bash.1
[root@mydesk etc]#
In the preceding command output, dash is listed before other alternatives (in this case bash). This is what you want to see before going on.
After handling any warnings, run the command again and say yes when asked if you want to upgrade the list of software presented.
OK, now run the same two commands again:
xbps-install -S
And then:
xbps-install -u
With either one, if you have any dire warnings, handle them. But if they're the kind of thing that just scroll up the screen, don't worry. After handling any warnings, run the command again and say yes when asked if you want to upgrade the list of software presented.
The final command could easily take more than an hour on a fast wire. It needs to download the newest version of every outdated program, which is likely most of the programs. Go off and have a cup of coffee.
When the upgrade is done, reboot the computer to make sure the new kernel you upgraded to works. If not, pick an old kernel off the Grub menu and ask for help on the #voidlinux IRC channel.
Enabling bash for root user
As shipped by Void Linux, the root user doesn't have bash for a shell, meaning that history and command-completion don't work the way you're used to. This is for security reasons: Using bash as root is slightly less secure than using just plain sh. Personally, I set mine for bash because I'll trade a little security for a lot of convenience. If you want them to work the way you're used to, you can either run the bash command every time you create a new command prompt, or you can set it up to work as bash automatically by editing /etc/passwd and, on the line for root, which is almost certainly the top line, replace /bin/sh with /bin/bash.
Your change doesn't take effect instantly. There are some ways to get it to take effect without rebooting, but given the fact that you finished installing this OS ten minutes ago, you probably have little to lose by rebooting again to enable the root user to have the bash shell.
Please remember, this change to bash for the root user is optional, so if you're not comfortable doing it, don't do it.
Adding Software
A working system doesn't guarantee that the software you need is on the system. You'll need to add software. First, go figure, vim and gvim aren't there: A deficiency that needs to be cured instantly:
xbps-install vim
xbps-install gvim
Or, if you drive on that side of the street:
xbps-install emacs
xbps-install emacs-x11
No screen multiplexer comes installed either, so do one or both of these:
xbps-install screen
xbps-install tmux
If you're anything like me, you use rsync all the time,especially in the early stages of configuring the computer tobe just how I want it. So do the following:
xbps-install rsync
Openssh will probably already be installed, but if it's not (for instance, there's no sshd command, perform the following command:
xbps-install openssh
If you run the preceding command when openssh is already installed, you'll just get a message that it's already installed: No problem.
Enabling Daemons
Void is different from other Linuxes. Merely installing a daemon doesn't make it start or autostart. Another way Void is different is that it uses the runit init system rather than the sysvinit, systemd or OpenRC that most other distros use. In my opinion, this is one of Void's huge advantages. Your init system is process #1: The only user level process the kernel ever runs. The init system then starts up everything needed to bring the computer to a useful state, including starting all the virtual terminals (ttys), and all the daemons.
Many so-called lightweight, close-to-the-metal Linux distributions use complex init systems (sysvinit or OpenRC), or downright convoluted and entanged init systems (systemd). Void is a true lightweight: It uses the very simple runit init system.
In Void Linux, when you install a daemon (let's say openntpd), it installs the executables and the configuration files and installs the runit directories and run scripts (similar to sysvinit/OpenRC init scripts but shorter, and similar to systemd Unit Files but actual shellscripts and usually shorter). The runit directory for openntpd is /etc/sv/openntpd. What Void installation doesn't do is activate the daemon: You need to do that yourself. To activate openntpd you issue the following command as root:
ln -s /etc/sv/openntpd /var/service/openntpd
The preceding command makes openntpd run now, run upon boot, and run again if for some reason it crashes (called respawning). To prove to yourself that openntpd is now running, issue the following command and notice the output should look like the following:
[root@local_gui /]# sv status openntpd
run: openntpd: (pid 1926) 138s; run log (pid 1925) 138s
[root@local_gui /]#
The preceding confirms that openntpd is running as pid 1926 and has been running for 138 seconds, and its logging facility is pid 1925 and has been running for 138 seconds. If you want to temporarily turn off openntpd, issue the following command:
sv down openntpd
To bring it up again do the following:
sv up openntpd
To restart it, the easiest to remember way is to combine the commands:
sv down openntpd
sv up openntpd
To disable the daemon through reboots, put a file called down in its directory, and in the log directory below it. The contents of the files are unimportant: They're often empty files.
touch /etc/sv/openntpd/down
touch /etc/sv/openntpd/log/down
Be aware that creating the down files doesn't immediately stop the daemon: You must use the sv command to do that, as discussed previously. Be aware also that not every daemon maintains a log, so there might not be a log file below the daemon's directory. Be aware, additionally, that the down file doesn't prevent starting the daemon with the sv command. Use the ls command to find out. Finally, you can make the the daemon come back on reboot by deleting the down files:
rm /etc/sv/openntpd/down rm /etc/sv/openntpd/log/downIf you want to also bring up the daemon right now, you need to use the sv command as discussed previously.
If you want to indefinitely disable the daemon without uninstalling it, you can delete its symlink in /var/service after killing it:
cd /var/service sv down openntpd openntpd/log; rm openntpdIf you delete its symlink, it won't start again on boot or on an sv command until you restore the symlink, as discussed previously.
Installing from Base System Install DVD
This section illustrates a very easy and sure fire way to install a non-GUI Void Linux base system. If you want the very fastest route to a working (though bare bones) system, I recommend this. Its smaller download size and much less packages makes installation just a few minutes.
Installation Preliminaries
Choose, download and burn the x86_64 base .iso from https://repo.voidlinux.eu/live/current/ that has your favorite window manager. For the example in this section I'll choose the LXQt DVD, the lastest of which was void-live-x86_64-20160420.iso on 1/9/2017. Insert the DVD in the computer's DVD drive, and begin your installation by following the following checklist:
- Boot the DVD
- From the grub menu, choose Void Linux (followed by version #). You can choose the RAM version or not: The RAM version is probably slower for the purpose of installation.
- Watch as over the next 5 to 40 seconds the computer boots to a command line interface (CLI) and asks you to log in. Notice also that the computer gives you the password for user root.
- Log in as root, using the password in the text above the login prompt.
- Type void-installer to enter the Void Linux installation program.
Specifying the Install
You're now in the nCurses installation program, observing a screen that resembles the following:
Read the screen, press Enter, and you'll be presented with the void_installer main menu, as follows:
The installation involves completing every choice on the preceding menu. Once you get used to it, completing the menu takes about 10 minutes, and the rest of the install takes 10 to 30, depending on computer speed.
- With highlight on
- With the highlight on , press Enter and choose your keyboard from the long list. If you live in the US and work only in English, it will be "us".
- With highlight on , press Enter, to be presented with the following Interface Menu screen:
Please be aware that your Interface Menu will look different and likely have more than one interface listed. - For each listed network interface you want to configure, highlight it, make sure there's also a highlight on the OK button, and press Enter to access its config screen, as follows:
- For simplicity, choose DHCP config. Assuming you have a working DHCP server on your subnet, you'll be told you have a working network connection and you can return to the main menu. Otherwise, you might need to manually config (say "no" to DHCP), which is doable by someone with some networking knowledge, but it beyond the scope of this document.
- Return to the main menu.
- On the Main Menu, highlight and , press Enter, pick "Local", and you'll be returned to the Main Menu.
- On the Main Menu, highlight, and put in one word.
- On the Main Menu, highlight, and choose from the long list. If you live in the United States and write only English, you'll probably select en_US.UTF-8. To reach it faster, you could type 'e' and then start using PageDown.
- On the Main Menu, highlight, and choose from the long list. Once again, letters and the PageDown key are your friends.
- On the Main Menu, highlight, and type in a password for the root user. You'll need to type it twice to check that you haven't made a typo. For gosh sakes, do whatever is necessary to remember it!
- On the Main Menu, highlight, and type in the username and password for the most frequent user. When it asks you to choose which groups the user belongs to, I suggest you leave the checked and unchecked groups as is and just highlight OK and press Enter.. DO NOT CHECK root!!! because that would be a horrendous security breach.
- On the Main Menu, highlight to be presented by the device list. An example with one possible disk device follows:
If your hardware has multiple disk devices, they'll all be listed here. - Highlight the disk device on which you want the bootloader installed. If you have multiple disks, choose the disk on which you intend to create the root partition. Once you've highlighted the right disk, press Enter to be presented with the following screen:
- I highly recommend you highlight and press Enter. In my opinion, graphics have no business in the boot process, and just make troubleshooting more difficult.
Let's discuss what's happened so far. You've answered almost all the questions needed for installation. All that's left is to partition the disk, install the proper filesystems, and let the installation run.
But partitioning and proper filesystems are the difficult part of an installation, so separate checklists are given for each.
Specifying the Partitioning
In the checklist for partitioning, I'll be presenting a very simple partitioning scheme, with /dev/sda1 as the swap partition, /dev/sda2 as the root partition, and no other partitions. Both of these partitions are primary partitions.
If possible, make the partitioning scheme for the boot drive be the old style MBR rather than the new GPT system. A GPT boot disk implies the EFI booting system, which is a huge traffic circle of data communication guaranteed to complexify everything. EFI boot systems have in the past been complicit in hardware damage, and there have been cases where people who erased their drive rendered their EFI-boot computer permanently unbootable. Compared to EFI boot, booting to an MBR partitioned disk yields a clean, modular system. The only reasons to use a GPT partitioning scheme on the boot drive are:
- The motherboard supports only EFI boot.
- You absolutely must have more than 3TB disk space on the boot drive.
- You absolutely must have more than 13 partitions on the boot drive.
On desktop systems with huge drives, I find it cost effective to have / (root partition) be on a small, cheap, small, MBR partitioned SSD disk, and have partitions like /home and /var directories on large, GPT formatted spinning disks. Please remember, GPT is a disadvantage only on the boot drive.
Many motherboards still support booting to MBR by setting something similar to "legacy boot" in the BIOS to True. In my opinion, as of January 2017, EFI boot is not ready for prime time, so try to buy motherboards that still support MBR booting.
NOTE:
GPT partitioning for non-boot disks is ready for prime time and probably preferable to MBR for many reasons. The only place you want MBR is on the drive getting booted, because a GPT disk can be booted only with EFI boot, and EFI boot is problematic.
The following checklist walks you through the partitioning.
- On the Main Menu, highlight and , and press Enter. You'll be presented with the disk list, and example of which follows:
- Highlight and press Enter. You'll be presented with the partition instruction screen as follows:
Read the instructions and then press Enter. - You'll be presented with the partition type chooser screen, as follows:
"dos" refers to an MBR partition. If you look at the preceding screenshot, you'll notice it's the cfdisk program: An excellent program for carving up disks. - Highlight and press Enter. The cfdisk program presents you with the following screen, to create and specify a new partition:
- With the upper highlight on the line and the lower highlight on the button, press Enter. You'll be presented with the following screen:
- Specify your desired swap partition size in gigabytes, by typing a number followed by an uppercase G (for GiB). Ideally it should be two times your RAM. You can use less if you have a lot of RAM, little disk space, and you don't care about hybernating your computer. In this example I use 2G, because my entire (Qemu) disk is only 6GB. When you've specified your desired size, press Enter.
- Now the program asks you whether you want this to be a primary or secondary partition. Highlight and press Enter. You'll be presented with the following screen:
- Highlight and choose Linux swap (82) from the list. You'll return to the previous screen, and notice that the partition type of /dev/sda1 has changed to swap.
- Highlight above and below, to specify /dev/sda2 in much the same way as /dev/sda1. Use the remainder of the disk for /dev/sda2, and specify it as a primary partition. You're returned to the specification screen, and has changed to .
- Highlight above and below, and specify type 83, Linux. You're returned to the specification screen.
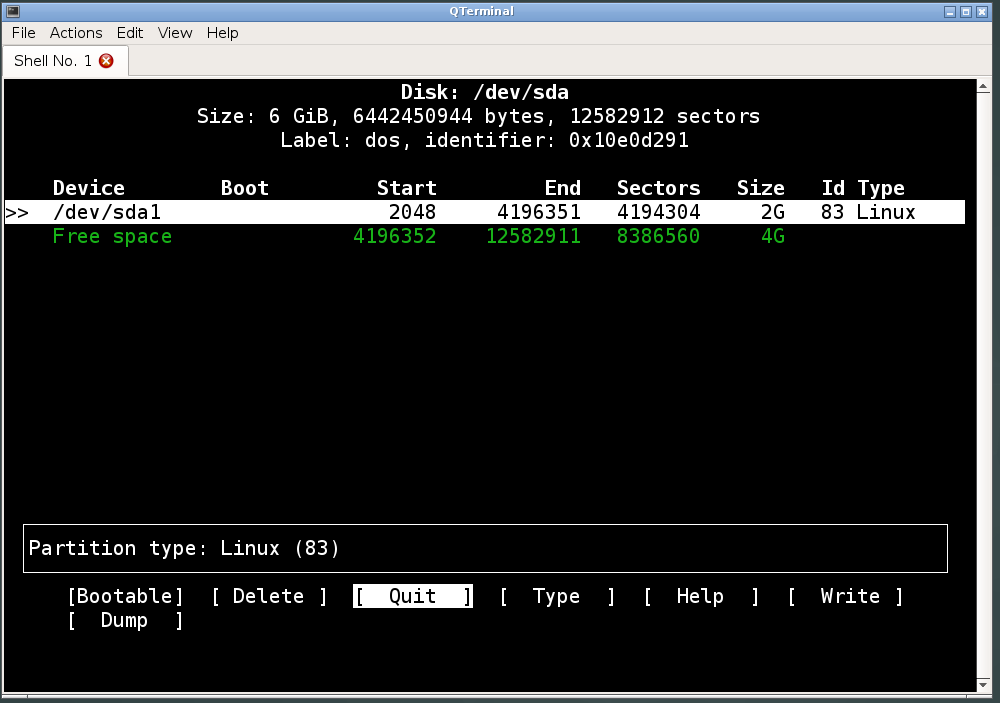
- Highlight above and below, and notice that the /dev/sda2 row now has a star in the "bootable" column. The following image shows the screen with its two partitions, of which /dev/sda2 is bootable:
- IMPORTANT: You'll lose all your work if you don't put the lower highlight on and press Enter. Unless you have reason to believe there's a mistake, do that now.
- Highlight and press Enter. You'll be presented with the main menu of void-installer.
Now the partitioning is done, but you still need to format the partitions, and in the case of the root partition, you need to mount it as user root. Unlike the rest of the Void installation, the part of the installation contains some unexpected behavior. The following checklist walks you through creating filesystems on the partitions you've created:
Specifying Filesystems and Mountpoints
In the checklist for filesystem making, I'll be presenting a very simple formatting scheme, with /dev/sda1 formatted as swap, and /dev/sda2 formatted as Ext4 and mounted as the root partition, with no other mounted partitions. The reason I chose Ext4 is it's reliable, it has good tools, it's easy to use, and it always works.
The following is the checklist for specifying filesystems and mountpoints:
- Highlight the list item and the button, and press Enter. You'll be presented with the following screen:
- Highlight and and press Enter. You'll be presented with the following screen:
- Highlight and and press Enter.
- Tell the program you want to format /dev/sda1. You'll be brought back to the drive list.
- Highlight and and press Enter. You'll be presented with the filesystem type list again.
- Highlight and and press Enter.
- Tell the program you want to mount /dev/sda2 as / (root), and yes, you want to format it. You'll be brought back to the drive list.
- UNEXPECTED BEHAVIOR ALERT: The drive list has no "Done" button, only . "Back" sounds intuitively like you need to redo something, but in fact it's how you tell the drive list screen you're done. If you had highlighted pressed Enter, you'd have had to redo an entire filesystem specification.
UNEXPECTED BEHAVIOR ALERT: Note that even though during partitioning you gave the partitions types (Linux swap 82 and Linux 83), the preceding list screenshots lists the "type" for both partitions as "none". This is because the "type" in the preceding screen depends on the format type, not the partition type. Not only that, but the "type" in the preceding screenshot depends on the format type of the format as it exists right now. So even after you use this screen to declare one swap and the other Ext4, they'll still show as "none" unless you complete this step and go back into it.
Main Installation
- Highlight the button and press Enter. You'll be brought back to the Main Menu.
- UNEXPECTED BEHAVIOR ALERT: When you come back to the Main Menu, the highlight is on the choice, as if your previous trip through filesystem definitions had failed, even though you did everything right while defining filesystems. Unless you have a reason to believe you did something wrong within filesystem specification, you can move past the choice.
- Highlight the choice and the button. You're presented with a warning screen listing the partitions you're going to format. Look at it very carefully to make sure that yes, you do want to partition those partitions.
- If you're OK with formatting the partitions listed in the warning, highlight the button and press Enter.
- The screen changes prompts a couple times in the next few minutes, letting you know what the installer is being done.
- Within a few minutes after you pressed Enter on the preceding step; two minutes on my Qemu virtual machine, the installation program "Void Linux has been installed successfully! Do you want to reboot your system?"
- Answer the question in the preceding question "No". Then highlight on the Main Menu, and the void-installer program finishes, leaving you at a command prompt as user root.
- Type the command poweroff. The computer shuts down cleanly.
- Do whatever's necessary to remove the DVD from the DVD drive. You might need to boot, get into the BIOS, and then press the drive button. Do what you have to. If you've installed in a virtual machine, change the command or shellscript or configuration so that the newly installed virtual guest boots to the hard drive.
- Boot the computer. If all went well, within 10 seconds to 2 minutes the computer boots into Void Linux OS at the command prompt.
- Log in as the non-root user you installed, using the password you gave that user. If you can do this, with the DVD not inserted in the DVD drive (or the installation thumb drive not in a USB port), you've proven you installed a working Void system. Now it's time to upgrade and add a few key programs...
Upgrade and Add a Few Key Programs
Log in as root.
You have a working operating system, but this OS is out of date, and not very secure. You'll soon fix that!
Temporarily disable all sudo recipes
First thing first, get rid of any possible misuse of sudo by disabling all recipes in /etc/sudoers.. As user root, make a backup copy of /etc/sudoers. (I suggest placing it in the /root directory, making sure it's owned by user root, group root, and making it chmod 400.
Now, to disable all recipes then run the program visudo, which is a special vi just for editing /etc/sudoers, and issuing the following commands:
- :%s/^/#/ Enter
- :wq Enter
Now somebody can't finagle their way into your non-root user and escalate to root using sudo. You can later use visudo again to enable your non-root user to do exactly what you want, but when doing so, please understand the security implications of your choices. For instance, it's possible for a person logging in as the non-root user to use sudo with the mount command to become root and completely control your computer. For the time being, just leave sudo powerless, with no recipes.
Upgrade
The OS you just installed is as up to date as the installation image you used to install it. For instance, I used ISO image void-live-x86_64-20160420.iso, presumably made with an up-to-date installation from April 20, 2016. I did that on January 12, 2017. Not only is this installation insecure (because of security problems found and patched since April 20, 2016), but it's almost impossible to add new software because the new software depends on modern versions of its dependencies. So the first that needs doing, after getting rid of any possible sudo misuse, is to bring the OS up to date. Start by running the following command:
xbps-install -S
The preceding updates your computer's repository information. Now upgrade your software with the following command:
xbps-install -u
What the preceding command does depends on how out of date your install ISO was. If your install ISO image is old enough that the package manager itself has changed, the preceding command upgrades only the package manager. Otherwise, it upgrades all software. Typically, the install ISO image is old enough that the package manager has changed.
WARNING!
If you see any messages marked "Attention" or "Warning" or anything like that, do what they ask. If you don't understand them, get on the #voidlinux channel on Freenode.org to ask about it.
One "Attention" item you'll likely confront is one saying something like "There are currently problems with the update process if the sh alternative is not set to dash." It then gives a command to find out the current alternative, and another to change that alternative to dash. Run the one to change it to dash, and use the other one to check that it's set to dash. If the output of the checking command lists dash before any other alternatives, you've successfully changed it to dash. On my computer, setting it to dash yielded the following:
[root@mydesk etc]# xbps-alternatives -l -g sh
sh
 - dash (current)
  - sh:/usr/bin/dash
  - sh.1:/usr/share/man/man1/dash.1
 - bash
  - sh:/usr/bin/bash
  - sh.1:/usr/share/man/man1/bash.1
[root@mydesk etc]#
In the preceding command output, dash is listed before other alternatives (in this case bash). This is what you want to see before going on.
After handling any warnings, run the command again and say yes when asked if you want to upgrade the list of software presented.
OK, now run the same two commands again:
xbps-install -S
And then:
xbps-install -u
With either one, if you have any dire warnings, handle them. But if they're the kind of thing that just scroll up the screen, don't worry. After handling any warnings, run the command again and say yes when asked if you want to upgrade the list of software presented.
The final command could easily take more than an hour on a fast wire. It needs to download the newest version of every outdated program, which is likely most of the programs. Go off and have a cup of coffee.
When the upgrade is done, reboot the computer to make sure the new kernel you upgraded to works. If not, pick an old kernel off the Grub menu and ask for help on the #voidlinux IRC channel.
Enabling bash for root user
As shipped by Void Linux, the root user doesn't have bash for a shell, meaning that history and command-completion don't work the way you're used to. This is for security reasons: Using bash as root is slightly less secure than using just plain sh. Personally, I set mine for bash because I'll trade a little security for a lot of convenience. If you want them to work the way you're used to, you can either run the bash command every time you create a new command prompt, or you can set it up to work as bash automatically by editing /etc/passwd and, on the line for root, which is almost certainly the top line, replace /bin/sh with /bin/bash.
Your change doesn't take effect instantly. There are some ways to get it to take effect without rebooting, but given the fact that you finished installing this OS ten minutes ago, you probably have little to lose by rebooting again to enable the root user to have the bash shell.
Please remember, this change to bash for the root user is optional, so if you're not comfortable doing it, don't do it.
Adding Handy Software
A working system doesn't guarantee that the software you need is on the system. You'll need to add software. First, go figure, vim and gvim aren't there: A deficiency that needs to be cured instantly:
xbps-install vim
xbps-install gvim
Or, if you drive on that side of the street:
xbps-install emacs
xbps-install emacs-x11
No screen multiplexer comes installed either, so do one or both of these:
xbps-install screen
xbps-install tmux
If you're anything like me, you use rsync all the time,especially in the early stages of configuring the computer to be just how I want it. So do the following:
xbps-install rsync
Openssh will probably already be installed, but if it's not (for instance, there's no sshd command, perform the following command:
xbps-install openssh
If you run the preceding command when openssh is already installed, you'll just get a message that it's already installed: No problem.
Adding GUI
WARNING!
If you ever intend to use IceWM, you must install it now, before installing other software, so that other software gets installed in IceWM's menu. Do this even if you intend to start with a different window manager.
xbps-install icewm
Decide on a window manager:
Don't get me started!
Whenever one discusses the graphical software with which a user interfaces to run programs and other computer tasks, invariably some definition hound gets on your case for calling a "desktop environment" a "window manager" or vice versa. I'm calling them all "window managers", because from the user point of view, they all do exactly the same thing, whether with their own helper programs or helper programs from other software projects, and regardless of how much or how little they "integrate" with the programs they run. So if anyone wants to call me wrong about calling KDE a "window manager", save your breath: Life's too short for distinctions lacking a difference (from the user point of view).
Now that that's over...
PRO TIP:
Every window manager is much more productive after you've installed dmenu from Suckless Tools, and configured your window manager to call up a specially configured dmenu with a window manager hotkey. Besides reducing mouse reliance, integrating dmenu also gives you an additional way to accomplish tasks if your window manager, especially its main menu, malfunctions.
I'm not kidding. dmenu is a revolution in effective computer keyboard use in the pursuit of productivity. I wouldn't use a computer not equipped with dmenu available with a simple hotkey.
Now that we've dispensed with the tips and disclaimers, if you want a graphical user interface (GUI), you need to choose a window manager. The following list gives some pros and cons:
- LXDE is lightweight, easy and amazingly stable and robust, but it will soon be deprecated. Nevertheless, as of 1/14/2017, I recommend it as the best, easiest, most stable, and most intuitive window manager currently available.
- LXQt is the successor to LXDE. It's not quite as easy or stable, but hopefully will become so. Using LXQt with startx instead of a display manager (like lxdm) is a megahassle, but fortunately, I've found the right way to start lxqt with startx.
- Openbox is very light, very configurable, very stable. There's no panel (taskbar) or start button, so it doesn't become a productivity tool until you install and properly configure the dmenu package.
- IceWM is lightweight and has similar qualities as LXDE, but it doesn't work well with the LXDM Desktop Manager, it isn't supported well, it's old and possibly deprecated, its menu doesn't know about many installed apps, and it takes a lot of custom configuration. However, if you're willing to learn its file-based configuration, it's great for systems that boot into CLI and then have the user do startx.
- fvwm is very lightweight and configurable. It's not easy to configure, and the tiny fonts it ships with lead to a catch-22 for those without the visual acuity to read how to enlargen the font. I have not found a way to incorporate fvwm with a system that boots directly to GUI via lxdm.
- i3 and Awesome are tiled window manager: A whole different interface. The minority of people who become proficient at tiled interfaces assume spectacular productivity with these two window managers.
- Mate is like Gnome2, if you like that sort of thing. A little on the heavy side, but reported to be excellent.
- Xfce is a fairly heavy "Desktop Environment" that's configurable and easy, but I've found it a little unstable. Also, it's slowly drifting in the direction of the systemd black hole, so it might later become unusable on non-systemd machines. Some of its features already misbehave on non-systemd machines.
- WindowMaker is a lightweight, very pretty and clean window manager loved by about 0.5% of the Linux population. I don't understand it, but those who like it love it. Windowmaker becomes much more productive with the addition of dmenu: In fact, I wouldn't use Windowmaker without dmenu.
- JWM is extremely lightweight. It's easy but has little issues that might slow some people down. The JWM that ships with Void Linux has no start button panel and could not run programs by clicking the desktop, which is a showstopper. In fact, I wasn't able to get JWM to work at all on Void Linux.
- KDE, Gnome3 and Unity are bloated, entangled, unstable problem creators, and should be avoided at all cost. Gnome3 is now completely wedded to systemd. Because of KDE's instability, I kicked all KDE software including its apps and library, off all my computers. Life's too short for intermittents.
Pick a window manager, and look up its package name by the following command:
xbps-query -Rs <wmname>
In the preceding, xbps-query -Rs <wmname> is the name of the desired window manager, all in lowercase.
Note:
You can install multiple window managers and use them one at a time.
Now that you know the package name of your desired window manager, run the command to install GUI. In the following example command, I install GUI with LXQt. To install a different window manager, just substitute that window manager's name for lxqt.
xbps-install xorg lxdm lxqt
The preceding command took about seven minutes on my Qemu VM Void installation. It would almost certainly take more time on metal: Maybe much more. This would be a good time to take a lunch or go about some other activities.
If you're like most modern people, you want your computer to boot straight into your window manager. To enable that capability, simply let runit know to start lxdm on boot, with the following command, performed as root:
ln -s /etc/sv/lxdm /var/service/lxdm
Within a few seconds of issuing the preceding command, you're brought to the lxdm login screen, that not only enables you to log in, but enables you to change which installed window manager you want to run, which language you want to interact in, and to quit by rebooting or shutting down. Take a few minutes to explore all of the lxdm login screen: Those few minutes will save you hours later on.
Enabling Daemons
Void is different from other Linuxes. Merely installing a daemon doesn't make it start or autostart. Another way Void is different is that it uses the runit init system rather than the sysvinit, systemd or OpenRC that most other distros use. In my opinion, this is one of Void's huge advantages. Your init system is process #1: The only user level process the kernel ever runs. The init system then starts up everything needed to bring the computer to a useful state, including starting all the virtual terminals (ttys), and all the daemons.
Many so-called lightweight, close-to-the-metal Linux distributions use complex init systems (sysvinit or OpenRC), or downright convoluted and entanged init systems (systemd). Void is a true lightweight: It uses the very simple runit init system.
In Void Linux, when you install a daemon (let's say openntpd), it installs the executables and the configuration files and installs the runit directories and run scripts (similar to sysvinit/OpenRC init scripts but shorter, and similar to systemd Unit Files but actual shellscripts and usually shorter). The runit directory for openntpd is /etc/sv/openntpd. What Void installation doesn't do is activate the daemon: You need to do that yourself. To activate openntpd you issue the following command as root:
ln -s /etc/sv/openntpd /var/service/openntpd
The preceding command makes openntpd run now, run upon boot, and run again if for some reason it crashes (called respawning). To prove to yourself that openntpd is now running, issue the following command and notice the output should look like the following:
[root@local_gui /]# sv status openntpd
run: openntpd: (pid 1926) 138s; run log (pid 1925) 138s
[root@local_gui /]#
The preceding confirms that openntpd is running as pid 1926 and has been running for 138 seconds, and its logging facility is pid 1925 and has been running for 138 seconds. If you want to temporarily turn off openntpd, issue the following command:
sv down openntpd
To bring it up again do the following:
sv up openntpd
To restart it, the easiest to remember way is to combine the commands:
sv down openntpd
sv up openntpd
To disable the daemon through reboots, put a file called down in its directory, and in the log directory below it. The contents of the files are unimportant: They're often empty files.
touch /etc/sv/openntpd/down
touch /etc/sv/openntpd/log/down
Be aware that creating the down files doesn't immediately stop the daemon: You must use the sv command to do that, as discussed previously. Be aware also that not every daemon maintains a log, so there might not be a log file below the daemon's directory. Be aware, additionally, that the down file doesn't prevent starting the daemon with the sv command. Use the ls command to find out. Finally, you can make the the daemon come back on reboot by deleting the down files:
rm /etc/sv/openntpd/down rm /etc/sv/openntpd/log/downIf you want to also bring up the daemon right now, you need to use the sv command as discussed previously.
If you want to indefinitely disable the daemon without uninstalling it, you can delete its symlink in /var/service after killing it:
cd /var/service sv down openntpd openntpd/log; rm openntpdIf you delete its symlink, it won't start again on boot or on an sv command until you restore the symlink, as discussed previously.
Starting lxqt from startx
As the successor to LXDE, the LXQt window manager is is hugely important to those prioritizing simplicity and stability over geez wow lookathat features. LXQt runs perfectly from the lxdm display manager on Void Linux when you boot straight to GUI. However, unlike LXDE, simply putting exec startlxqt or exec lxqt-session in your ~/.xinitrc file does not result in a working system.
So here's what you do. Create and make executable by all the following ~/lxqt-session.sh:
#!/bin/sh

# Open lxqt-session's children
/usr/bin/openbox --config-file /home/slitt/.config/openbox/lxqt-rc.xml
&
/usr/bin/pcmanfm-qt --desktop --profile=lxqt  &
/usr/bin/lxqt-globalkeysd  &
/usr/bin/lxqt-notificationd  &
/usr/bin/lxqt-panel  &
/usr/bin/lxqt-policykit-agent  &
/usr/bin/lxqt-runner  &
/usr/bin/lxqt-powermanagement  &

#Make this process become lxqt-session
exec /usr/bin/lxqt-session
Next step is to make your ~/.xinitrc look like the following:
#!/bin/sh
exec $HOME/lxqt-session.sh
Now, when you issue the startx command, LXQt runs just like it runs when you boot straight to GUI.
For more information on how this technique was derived, and how to derive your own technique if this doesn't work on a later version of Void Linux or on a different distro, see this quickhacks entry.
[ Training | Troubleshooters.Com | Email Steve Litt ]