Troubleshooters.Com
Presents
|
Linux Productivity Magazine
Volume 1 Issue 3, October 2002
LyX Quickstart
|
Copyright (C) 2002 by Steve Litt. All rights reserved.
Materials from guest authors copyrighted by them and licensed for perpetual
use to Linux Productivity Magazine. All rights reserved to the copyright
holder, except for items specifically marked otherwise (certain free software
source code, GNU/GPL, etc.). All material herein provided "As-Is". User
assumes all risk and responsibility for any outcome.
[ Troubleshooters.Com
| Back Issues ]
|
Everything that is really great and inspiring
is created by the individual who can labor in freedom.
-- Albert Einstein
|
CONTENTS
Editor's Desk
By Steve Litt
When converting from Windows to Linux in March 2001, I was troubled by
what I perceived as a lack of book writing software for Linux, so my assumption
was that I'd continue writing books in MS Word. This decision wasn't arrived
at lightly. The Abiword and Kword software available back then seemed useless
for long documents. StarOffice had major cut and paste problems, and various
other quirks rendering it a suboptimal book authoring package. LyX looked
very promising, but it seemingly could not export to any format in which
styles were preserved, so I worried that if my documents were in LyX, I
couldn't transition to another tool if so desired. This worry turned out
to be false, but I didn't know it at the time.
Docbook XML looked like a great alternative. Standard. Up and coming.
Exportable to just about anything via scripts, with content totally separate
from appearance. But alas, Docbook XML front ends were few and far between.
LyX can be used as a front end for Docbook SGML, but not Docbook
XML.
There were a few other front ends in their infancy, but nothing that could
really write a book. The only mature front end was EMACS, and that's a
problem because EMACS and I don't get along.
So I settled on retaining MS Word. I'd VNC to my Windows box in the
corner, and MS Word would Samba back to my book's file on my Linux desktop
box. Perfectly workable.
Except that as time goes on, you really start noticing what a pain Windows
and even MS Word are. I started looking around again. The turning point
came while examining a LyX document in VI. It was text, human readable,
and obviously very parsable. My one objection to LyX had been lack of styles-based
export. But a look at the native LyX document proved it was one of the
most exportable, because one could write a Perl program to turn LyX data
into anything, including XML.
It took another 2 weeks to thoroughly evaluate LyX, making sure there
were no dead ends that could stop my book in the middle. There weren't.
In August 2001 I stopped my evaluation and began to write.
Today I have a beautifully typeset 309 page book, "Troubleshooting
Techniques of the Successful Technologist". It has a stylistic consistency
I've never achieved with MS Word or WordPerfect. It has an accurate table
of contents, unlike most of my previous books, whose software (Word or
WordPerfect) goofed up page numbers so that hand editing was required for
the table of contents. My book has a very nice index -- a feature I'd never
included in previous books because it seemed too difficult with Word or
WordPerfect.
One might assume that life was easy with LyX. It wasn't. Unbelievably,
LyX doesn't support character styles. Creating paragraph styles can
take hours or even days instead of the minutes you'd expect from using
MS Word or WordPerfect. LyX doesn't have MS Word's outline view. Although
LyX made most work trivial, every once in a while you run into a seemingly
trivial task, such as adding extra lines to the title page, that require
much research and experimentation. LyX can be daunting!
Which is exactly why I'm writing this quickstart. This issue of Linux
Productivity Magazine gives you the tips and secrets necessary to avoid
the time consuming blind alleys I was forced to travel. Using this LPM
issue, your use of LyX will be relatively straightforward. When you've
read this magazine, you'll be able to write books in LyX.
And remember, if you use Linux or other free software, this is your
magazine. Enjoy!
We Stand On Their Shoulders
By Steve Litt
LyX is a miraculously productive way to write books, articles, reports,
slideshows, and other long documents. The LyX project development team
has done a superb job. There are few bugs, and every version brings ever
more wonderful features.
LyX is more than a great product. It's backed by a vibrant, knowledgeable
and helpful community. Their mailing list is a fountain of information.
Their main list has many tens of experts on LyX and LaTeX, and every time
I think I'm a really smart LyX guy I read their posts and realize I'm still
a raw newbie. Almost everything you read in this Linux Productivity Magazine
issue came directly or indirectly from the LyX list.
The LyX website has a huge subsite devoted to various LyX solutions.
It's a little hard to search and navigate, but it's worth it, because solutions
to most common and not-so-common problems are there. This subsite was put
together by LyX expert extraordinaire Herbert Voss.
A special shout-out goes out to LyX Guru Dekel Tsur, who answered my
question about how to make character styles. It was Dekel who showed me
the how to code Color Pseudostyles as a substitute for character styles.
Color pseudostyles allowed me to proceed with the writing of my book, and
indeed to adopt LyX as Troubleshooters.Com's official book authoring software.
No recognition is complete without thanking Richard Stallman, creator
of the GNU GPL, which made all free software and Open Source possible.
And certainly Linus Torvalds must be thanked for founding the operating
system that moves us from what was our comfort zone, enabling the masses
to discover LyX. Beyond that, thanks to everyone who works on free software
-- we stand on your shoulders.
LyX Overview
By Steve Litt
LyX defies categorization. It's not a word processor, because it doesn't
facilitate appearance editing the way word processors do. It's not a desktop
publisher, because you don't lay out pages -- you type content. It's not
a typesetting program, because it does much, much more than typeset.
LyX is a styles-based, write once, publish everywhere authoring tool.
A LyX document can be exported to postscript, pdf, paper (of any size --
it's simple to change the paper size, and everything falls where you'd
expect), HTML, and probably soon other formats. For each format, LyX "does
the right thing". And if your idea of the right thing isn't the same as
LyX's, you can fix it with a few style changes.
On a more technical level, LyX is a GUI front end to the LaTeX publishing
language. The fact that LyX is GUI means that styles can be represented
in the LyX environment with a somewhat similar appearance to how they'll
appear on paper. In other words, you can construct your style so that if
it appears large and italic on paper, it will appear large and italic on
in the LyX window.
The other cool thing about LyX is that even though LaTeX is a markup
language, LyX hides most markup, so as an author you don't need to break
your train of thought to insert codes. You simply choose paragraph styles,
or, as you'll learn later in this magazine, color-based pseudo character
styles. Nevertheless, for that rare case where you need to "fine tune"
a piece of text, you can go into TeX mode, which is markup. TeX mode is
often called Evil Red Text (ERT for short), because in older LyX versions
it appears in red on the LyX screen, and it's LaTeX markup which can be
extremely complex for the uninitiated. But ERT guarantees that with enough
drive and knowledge, you'll be able to accomplish just about anything in
LyX.
|
NOTE
In versions 1.2.x and later, ERT is no longer red, but instead appears
as a button which, when clicked, expends to show the LaTeX code. |
Fine tuning is best done seldom, because excessive fine tuning ruins
the document's consistency. LyX is made for documents that should be consistent.
You would
never use LyX for a flyer or a short advertisement where
layout is everything. You'd use it for a long article, book, slideshow,
or website, in which consistency is key.
So try not to fine tune your document, but instead fine tune its styles.
How to fine tune your styles is covered later in this magazine.
As previously mentioned, LyX is a front end to LaTeX. LaTeX is a macro
language used to produce the TeX language. TeX is a typesetting language,
invented by Donald Knuth, the eminent computer scientist. So the conversion
goes like this:
LyX==>LaTeX==>TeX==>DVI==>Postscript
Besides being a front end, LyX is also a language. A LyX document is not
entirely valid LaTeX, although much of a LyX document might be valid LaTeX.
So a more complete description of the process would look like this:
Author==>LyX front end==>LyX language==>LaTeX==>TeX==>DVI==>Postscript
This is somewhat problematic, because the LyX language is very similar
to LaTeX, but not the same. As a new LyX user, one of your greatest challenges
will be to know the differences between LyX language and LaTeX, and when
to use each. If you read this magazine completely you'll understand.
Last but not least, here is a screenshot of a LyX session (editing my
book, as a matter of fact):

Starting at the top is the titlebar, and then comes the menubar, with
all the usual menu categories. Then comes the buttonbar, whose leftmost
element is a selector for the paragraph style. Paragraph styles are known
as "Environments" in LyX. Below the buttonbar is the editing area where
you type in your content. The red text is ERT (TeX mode), and the black
text is pure content. The reason there's so much ERT is that this is my
title page, which needed quite a bit of fine tuning. If you're using a
browser that can't properly render .png files, the colors of the
preceding screenshot are as follows:
| Titlebar |
Dark green |
| Titlebar text |
Yellow |
| Menubar |
Gray |
| Menubar text |
Black |
| Buttonbar |
Gray |
| Buttonbar text |
Black |
| Edit area background |
Bright but low saturation yellow |
| Normal text in edit area |
Black |
And here are the uses of some of the buttonbar buttons:
|
|
|
Environment chooser |
|
Lets you choose an environment, which is the LyX word for paragraph
style. |
|
|
|
Emph (emphasis) button |
|
For emphasized text, translates directly to italics. |
|
|
|
Noun button |
|
For proper names and first use of new words, translates directly
to small caps |
|
|
|
Code button |
|
For computer code within text, converts directly to monospaced.
This button probably won't appear in your setup -- I installed the button
myself using techniques from /usr/share/lyx/doc/Customization.lyx. |
|
|
|
Tex (ERT) button |
|
To enter LaTeX directly into the document, press this button. Note
it's pressed in the screenshot. In versions before 1.2.x, the text you
enter will be red, hence the name Evil Red Text. Version 1.2.x and later
show this inline LaTeX as an expandable button. |
|
|
|
Math button |
|
Press this button to enter math mode, where you can enter equations
that print out like they would in a math book. |
Note that the Emph, Noun and Code buttons do not insert a character
style, but instead insert a typeface. Unfortunately, LyX has no built in
character styles. Later in this magazine you'll see how to create color
based pseudo character styles to accomplish what you want.
Understanding LyX Through
Contrasts
By Steve Litt
One of the most effective routes to understanding is the exploration of
contrasts. In this article we'll examine the following contrasts:
-
Fine Tuning vs. Consistency
-
Graphical Layout Specification vs. Numeric Layout Specification
-
Word Processors vs. Content Authoring Tools
-
Using Styles vs. Creating Styles
-
Default vs Created Styles
-
Character Styles vs. Paragraph Styles
-
LyX the Language vs. LyX the Front End
-
LyX Code vs. LaTeX Code
Fine Tuning vs. Consistency
Fine tuning is the word LyX folks use for micromanaging the appearance
of each page of your document. Such micromanaging almost guarantees that
your document, if long, will not have a consistent appearance throughout.
Some content is best micromanaged. Certainly flyers, advertisements
and glossy brochures are most effective when each individual element is
placed and sized just so. But anything over 10,000 words (15-30 typewritten
pages or longer), and certainly any book, must feature consistent styles
throughout.
Fine tuning is done by assigning attributes to individual text, pictures,
or whatever. Consistency is achieved by assigning attributes to styles,
and then assigning those styles to text and other elements of your document.
Sometimes the requirement for consistency is not within the document,
but instead between documents of the same type. For instance, you might
need all your letters to appear the same. In such a case, you'd start with
a template consisting of elements with the right styles. Other business
documents such as legal documents, order forms and the like are also candidates
for consistency.
LyX does an outstanding job at producing fine looking, consistent documents
based on styles. LyX can do fine tuning, but doing so is difficult enough
that you'll probably want to use other software (KWord, Gimp, etc) for
brochures, flyers, advertisements, and other content whose look must be
artistically managed at the page and element level.
Graphical Layout Specification vs. Numeric Layout Specification
Products like Microsoft Word and OpenOffice offer the easy to use and intuitive
feature of graphical layout specification. You can highlight text and set
it 3 points bigger, bold and italic, with a couple mouse clicks. You can
even drag paragraph margins to make paragraphs fatter or skinnier. This
type of work can be thought of as graphical layout specification.
There's also numeric layout specification. You generally need to insert
tags. Creating the right spacing requires trial and error -- changes to
numbers describing the layout, followed by viewing the final output, to
determine how close you got to your ideal layout.
Obviously graphical layout specification is faster, so why would anyone
want a product with numeric layout specification? The simple answer is
accuracy and adaptability. My oldest book, "Troubleshooting:
Tools Tips and Techniques" was written in WordPerfect 5.1, which used
numeric layout specification. Using styles, I created chapter pages with
beautiful page borders and outline boxes. A few years later I tried to
convert this document to MS Word, and failed miserably. The chapter pages
were flawed, and nothing I could do in MS Word could fix them. MS Word
uses graphical layout specification, and when it comes to exacting layout,
there's no substitute for numeric layout.
Graphical layout is easier, numeric layout more precise. LyX uses numeric
layout. Fortunately, the numeric layout need be done only once for each
style, and the style can be used throughout the document, or even across
multiple documents.
Word Processors vs. Content Authoring Tools
The tools commonly called word processors are optimized for easy use by
untrained people. They excel at that.
Most other content authoring tools are designed so that the author can
work entirely within a predefined set of styles. The styles relate to the
content, not to any desired appearance. This usage of styles frees the
author from the need to consider appearance.
When the document is complete, if the appearance isn't as desired, the
styles can be modified to create the desired appearance throughout the
book, without the need to search for specific text.
LyX is a content authoring tool, not a word processor.
Using Styles vs. Creating Styles
When writing Samba Unleashed, I was given an MS Word template with relevant
styles, and the Macmillan style guide specifying when to use each style.
It was trivial to follow the style guide instructions, and the document
turned out exactly how Macmillan's editors, indexers and layout people
needed it.
Somebody had to create those styles, and that was fairly difficult.
However, it was not as difficult as it could have been, because word processors
such as MS Word, OpenOffice and WordPerfect make it fairly easy to create
styles.
Unfortunately, creating styles in LyX is downright difficult, because
LyX uses numeric layout specification and for other reasons that will be
discussed later in this magazine. And yet there is a small body of knowledge,
revealed later in this magazine, that removes most of the complexity associated
with creating styles in LyX. By the time you've finished this magazine
you won't consider it difficult to create styles in LyX.
Default vs Created Styles
LyX comes with several sets of predefined styles called "Document Types"
. Ready made document types include "Book", "Article", "Report", "Letter",
and many, many more. If you're willing to accept the default look and behavior
of the document type you select, LyX authoring is trivial -- probably easier
than using MS Word, OpenOffice or WordPerfect.
But the minute you're dissatisfied with the look of any of the predefined
styles, or if you find yourself in need of a new style to be applied to
a type of content not anticipated by the person who created the document
type, you must modify or create the style yourself. And that, my friends,
is difficult -- much more difficult than style creation or modification
in Word, OpenOffice or WordPerfect.
The dichotomy between default and created styles explains the discrepancy
between those who say LyX is "trivially easy" and those who say it has
an "immense learning curve". The person who accepts the defaults operates
LyX intuitively, while the person wanting to extend the defaults can find
LyX extremely difficult.
The articles in this magazine give you the information to modify and
create styles without strain, thereby getting the best of both worlds.
Character Styles vs. Paragraph Styles
Character styles apply an appearance to arbitrary pieces of text. They
typically identify attributes of letters and words -- size, typeface, weight,
slant, small caps, character and word spacing and the like.
Paragraph styles apply to entire paragraphs, and include not only the
text attributes mentioned in the preceding paragraph, but also specify
paragraph attributes: Line spacing, interparagraph spacing, indentation,
and justification.
In LyX, paragraph styles are called "environments", and are implemented
with a richness that leaves other tools in the dust. However, LyX inexplicably
has no character styles. This, in my opinion, is by far LyX's worst flaw
-- in fact it would be a fatal flaw if not for a workaround associating
a color with a set of text attributes.
The LyX mailing list has recently featured discussions on the best way
to implement character styles, so I'm confident a future version of LyX
will add this desperately needed feature.
Until genuine character styles are added to LyX, the color workaround
gives most of the benefits of character styles, and when character styles
are implemented, conversion of the color workaround to genuine character
styles will be accomplished by simple scripts. The color workaround
is completely documented in a later article in this magazine.
LyX the Language vs. LyX the Front End
The intent of LyX is to be a front end to the LaTeX macro language, which
itself is a macro front end to the TeX typesetting language. LyX has a
GUI user interface into which you can type your content, selecting environments
(paragraph styles) and occasionally fine tuning individual paragraphs and/or
text phrases.
The information typed into the GUI user interface is stored in a single
file, usually with a .lyx extension. That file contains LyX language
format. This LyX language is very simple, readable and parsable, and yet
it captures all the information needed to create almost any publishing/formatting
task.
To create the final output, the LyX user interface first converts the
LyX language markup to LaTeX, and then the latex2e program converts
the LaTeX to DVI (Device Independent) language. From there, other programs
can convert the DVI to other formats. For instance, the dvips
program converts it to Postscript.
So, to summarize, LyX is both a GUI user interface, and a language produced
by that user interface.
LyX Code vs. LaTeX Code
If you understand LaTeX language, and you look at a .lyx file,
you'll see that much of the .lyx file is really LaTeX language.
In fact, the main purpose of the LyX specific language is to specify the
look and behavior of environments in the LyX GUI user interface, rather
than the look and behavior of the final output, which is specified by LaTeX
language.
Understanding the differences between LyX language and LaTeX language
is THE single most important distinction necessary to use LyX to create
documents conforming to your requirements or the requirements of those
who commissioned your work. An entire article in this magazine is devoted
to the various distinctions between these two languages. You'll learn how
to recognize each, and when to use each.
Summary
One way to understand LyX is by understanding the contrasts surrounding
it:
-
Fine Tuning vs. Consistency
-
Graphical Layout Specification vs. Numeric Layout Specification
-
Word Processors vs. Content Authoring Tools
-
Using Styles vs. Creating Styles
-
Default vs Created Styles
-
Character Styles vs. Paragraph Styles
-
Default vs Created Styles
-
LyX the Language vs. LyX the Front End
-
LyX Code vs. LaTeX Code
LyX Facts and Myths
By Steve Litt
LyX is a splendid tool for creating long documents professionally, as well
as producing single source, multi use (paper, slides, html, pdf, etc) documents.
It's licensed under the GNU GPL license, meaning you have every right to
give copies to a hundred or a thousand of your friends or customers, and
you have every right to access and modify LyX's source code.
Until recently, the LyX user interface was based exclusively on a library
tool called Xforms. Xforms is somewhat quirky, and it's often hard to incorporate
into a working Linux system. As a result, it's often easiest to use the
LyX version that shipped with your Linux distribution, rather than trying
to install a newer version with rpm, apt-get or compiling. Interestingly,
LyX is also available for Windows, so you can use it at your Windows-only
client sites.
From what I understand, recent versions of LyX can work with the QT
GUI environment, but I'm not sure.
LyX Myths
Some of the LyX myths that pop up often include:
LyX is a word processor
LyX is easy
LyX is impossibly difficult
You should use LyX for everything
LyX is a word processor
LyX is NOT a word processor, and shouldn't be used as such. It's overkill
for a 5 page school paper. It makes fine tuning of pages very difficult,
which is not what you want on a flyer or short paper. LyX is not as obvious
(i.e. user friendly) as a word processor.
LyX is easy
When you hear this statement, it's either pro-Lyx or pro-Linux propaganda,
or it's spoken by someone who has never needed to modify LyX defaults.
Usually it's both propaganda and spoken by a newbie. LyX isn't easy precisely
because it is used to do difficult things, like lay out entire books in
a consistent manner.
LyX is impossibly difficult
This statement is either pro-Windows propaganda (the usual line of "reasoning"
is that users are too stupid to use challenging programs -- we want something
"grandma" can use), or else it's voiced by someone who did a LyX evaluation
and found dead ends. LyX isn't impossibly difficult -- thousands use it
worldwide, and they're not all geniuses. I'm sure not.
LyX is not difficult, but it can appear that way to new LyX users. Although
LyX handles extremely difficult tasks with aplomb, occasionally trivial
tasks involve an almost insane level of knowledge, research, work and debugging.
Further complicating the matter is the lack of good LyX howto type documentation.
There is adequate newbie documentation, and voluminous reference material
for the LyX expert, but there's a hole in the middle. That's the purpose
of this Linux Productivity Magazine -- to help fill that hole.
The LyX culture is one of expertise. Ask a howto question on the LyX
mailing list, and you're likely to get a dozen lines of LaTeX code without
context. The heavy hitter inhabitants of the LyX list learned English as
a second language -- their first was LaTeX. Many don't remember what it's
like not to have a clear understanding of the difference between LyX code
and LaTeX code, when you use each, and where.
But if you know what documents to read, and how to read them, and make
notes for yourself, and read articles like those contained in this magazine,
LyX will be very much within your grasp. And the end product is worth the
extra work.
You should use LyX for everything
Once again, this myth is LyX propaganda. Using LyX to write a simple note
is like taking a commercial airplane to go 50 miles. You can do it, but
there are easier ways. Use LyX for documents where content is king, and
consistency is a must.
LyX Hello World
By Steve Litt
This article will get you started in the world of LyX. Your first step
is to run LyX. If LyX is not installed on your system, or if the wrong
version is installed, please refer to the Installing
or Upgrading LyX article later in this magazine. If LyX is installed
properly on your system, you can run it simply by typing
lyx
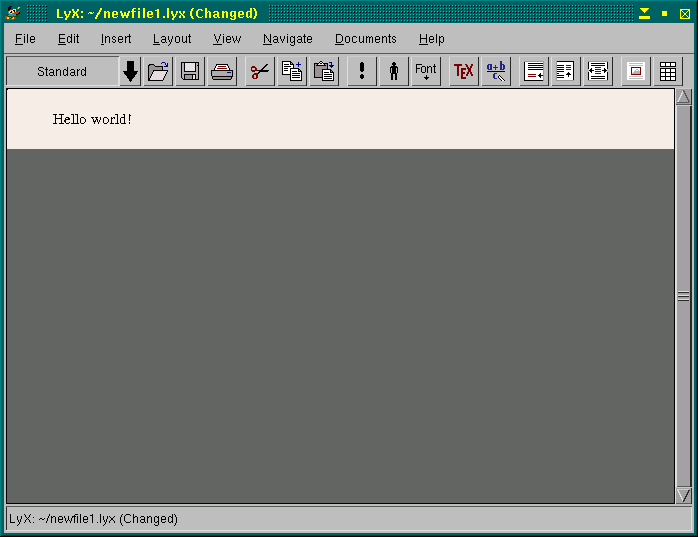
at a command prompt. LyX will load, and your edit area will be gray and
empty because you have not loaded a document. The screen should look something
like this:

For the first 8 seconds after loading you'll see a splash screen, and
that splash screen will get in the way of your work. If you can't work
around it, wait 8 seconds and it will go away.
|
NOTE:
An astute Linux Productivity Magazine reader pointed out that you can
configure LyX not to display the splash screen at all. Given the inconvenience
of the splash screen, I think this is an excellent idea. Here's how you
do it:
Edit->Preferences->Look_&_Feel_tab->Misc_subtab->Show_banner_button:
Off |
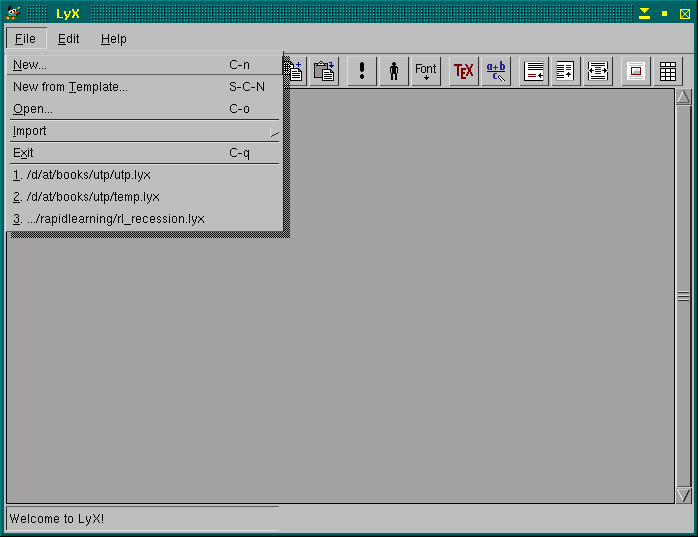
Your next step is to create a new document, which you do by selecting
file->new, of course:
And then you'll be brought to an empty document that looks like this:

Type the words "Hello world" in the edit area as follows:
Now save as hello.lyx in your home directory, and then from the menu
choose View->Postscript, and your machine's default postscript file viewer
will show the page. On my system it looks like this:

You can print that file from the postscript viewer program. But you
often get better output having LyX produce a .ps file. To create
a .ps file, do the following:
-
From the menu system, File->Export->Postscript
-
Notice that on the status bar, it tells you the name of the file exported
-- in this case ~/hello.ps.
-
lpr ~/hello.ps
-
Note that the paper is a clone of what you saw in the postscript viewer.
Lastly, close your hello.lyx document with the File->Close menu
command.
Conclusion
When you've completed the exercises in this article, you've run LyX, made
the simplest possible LyX document, viewed it as postscript, and output
it as a postscript file which you then printed. You have a working LyX
installation, and you're able to manipulate it in a minimal way.
The next article will walk you through creating a letter, which is a
very simple LyX document created with a template.
Writing a Letter
By Steve Litt
Perhaps the easiest LyX task is to write a letter. LyX has a pre-made letter
template enabling you to simply fill in the blanks (really what you do
is replace the prompts). Follow these steps:
-
From your home directory, run this command: lyx &
-
Notice that LyX loads with no document
-
File->New_from_Template
-
A list of .lyx files from /usr/share/lyx/templates/ appears
-
Choose letter.lyx
-
A blank letter template appears, as shown below:
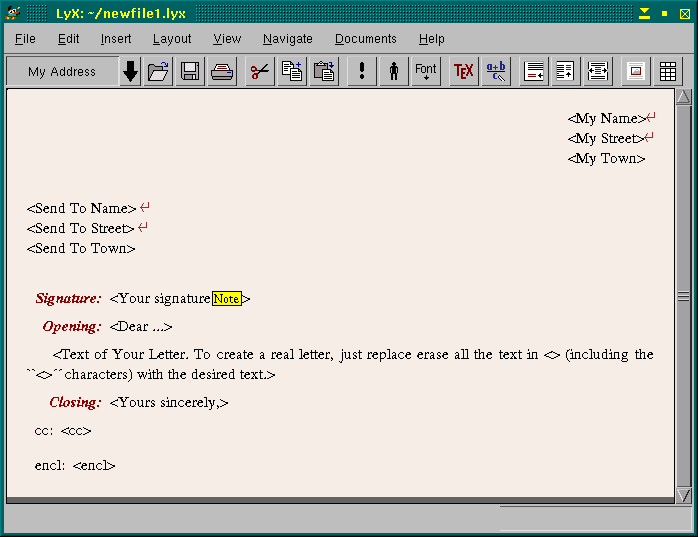
Now replace each part surrounded by angle brackets with the info requested.
Your return address goes in the upper right, the send to address goes below
it on the left side. Your name replaces the <Your signature> prompt.
If you click the note in that prompt, it will tell you that yes, that's
right, you need to place your signature above the body of the letter. Replace
the <Dear...> prompt with your salutation (such as Dear Mr. President:
or Dear Jim,). Be sure to include the trailing punctuation (comma informally,
or colon in a formal letter). Replace the <Text of Your Letter etc>
prompt with what you want to write. Replace <Yours sincerely> with your
closing.
If you have carbon copies, replace <cc> with them. Otherwise, delete
the <cc>. If you do, when you move the cursor to a different line, the
entire line disappears. Similarly, replace <encl> with your list of
enclosures, or else delete it.
Save the file, then View->Postscript, and notice how you have a nicely
formatted letter.
But wait a minute! The postscript file shows a date, and yet you never
input one. LyX has deduced the date as today's date. This is great if you
intend to save the postscript file and not the LyX file. But if you save
the LyX file, and you print it a month later, the date of printing will
show up. That's no good at all.
Salvage the situation with some ERT (Evil Red Text -- TeX mode).
At the start of the top line -- the one containing your name, prepend
the following string:
\date{2/14/2002}
That date corresponds to Valentines day 2002. Now highlight the text you
just typed, and click the TeX button ( ).
The text just turned red. You've created a LaTeX date command that will
determine the date printed in the letter. View the letter with View->Postscript
again, and notice that the letter's date is now Valentines day 2002. If
it is not, refresh your postscript viewer.
).
The text just turned red. You've created a LaTeX date command that will
determine the date printed in the letter. View the letter with View->Postscript
again, and notice that the letter's date is now Valentines day 2002. If
it is not, refresh your postscript viewer.
|
NOTE
I've read that some 1.2.x versions don't allow highlighting and marking,
and instead you must click the TeX button and copy text into the resulting
field. |
The prompts you replaced are really environments, which, as mentioned
previously, are LyXese for paragraph styles.
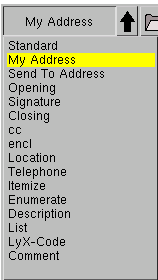
It's instructive to click the down arrow on the environment selector
(the leftmost thing on the buttonbar), and view the list of environments
for this document. It looks something like this:
 |
|
|
REMINDER:
In the LyX world, "Environment" means "Paragraph Style". |
|
Look at the environments, and notice how some, such as My Address, Send
To Address, Opening, Signature, Closing, cc, and encl correspond to parts
of the letter. Notice that environments Location and Telephone are things
that are likely to go in a letter, although this template doesn't prompt
for them. Environments Standard, Itemize, Enumerate, Description, List,
LyX-Code, and Comment are general environments useful in most document
types:
| Standard |
Normal paragraph body text |
| Itemize |
A bulleted list |
| Enumerate |
A numbered list |
| Description |
A word/definition list |
| List |
|
| LyX-Code |
Show multiple lines of source code in this environment |
| Comment |
|
If you've gone straight through this magazine, you've performed two
exercises -- the "Hello World" and the letter. There are plenty more exercises,
but before you do them you should know about installing and upgrading LyX,
and LyX documentation resources. Read on...
Installing or Upgrading LyX
By Steve Litt
Thankfully, most Linux distributions come with a working LyX. If LyX isn't
installed on your system, you probably can install it by installing the
xforms rpm off your install CD's, and installing the LyX rpm off your install
CD. However, if those rpm's don't exist, or if you want to install a later
version, things get more complicated.
I won't discuss Debian, because I don't have it. From what I understand,
Debian's handling of dependencies is so good that upgrading isn't a challenge.
It's much more challenging in Mandrake. My Mandrake 8.2 installation shipped
with LyX version 1.1.6fix4. I downloaded version 1.2.1 via the file
lyx-1.2.1-1.i386.rpm.
An installation attempt:
rpm -Uvh lyx-1.2.1-1.i386
griped about needing xforms and needing libstdc++-libc6.1-2.so.3.
I started with xforms. Installing a much newer version (0.99) didn't work,
so I went to ftp://ftp.lyx.org/pub/lyx/contrib/ and downloaded
xforms 0.88. I think version 0.89 would have worked too, but I had read
on the LyX mailing list that LyX is more stable with xforms 0.88. So I
did an rpm -Uvh on the rpm, and it said I had a newer version,
so it was necessary to uninstall version 0.99 with an rpm -e xforms
command. Of course that required me to issue an rpm -e lyx command
to get rid of 1.1.6fix4. Then I was able to install xforms 0.88.
From there I tried another LyX 1.2.1 installation, and it once again
griped about the lack of libstdc++-libc6.1-2.so.3.
A quick file search with a packaging manager located several similar
(but not identical) files in the /usr/lib directory. A directory
listing revealed the following:
[root@litttest lyxinst]# ls -l /usr/lib/libstdc++*
-rw-r--r--    1 root     root       452342 Feb 21  2002 /usr/lib/libstdc++-3-libc6.2-2-2.10.0.a
-r-xr-xr-x    1 root     root       299756 Feb 21  2002 /usr/lib/libstdc++-3-libc6.2-2-2.10.0.so*
lrwxrwxrwx    1 root     root           24 May 14 10:49 /usr/lib/libstdc++-libc6.1-1.so.2 -> libstdc++-libc6.2-2.so.3*
lrwxrwxrwx    1 root     root           30 May 14 10:57 /usr/lib/libstdc++-libc6.2-2.a.3 -> libstdc++-3-libc6.2-2-2.10.0.a
lrwxrwxrwx    1 root     root           31 May 14 10:49 /usr/lib/libstdc++-libc6.2-2.so.3 -> libstdc++-3-libc6.2-2-2.10.0.so*
[root@litttest lyxinst]#
As you can see, many of these are links. Not knowing what the heck I was
doing :-), I made the following link:
ln -s /usr/lib/libstdc++-libc6.2-2.so.3 /usr/lib/libstdc++-libc6.1-2.so.3
The preceding command just assigned the correct name to the existing version
6.2.2 file. Smart idea, but it didn't work -- still griped about the lack
of libstdc++-libc6.1-2.so.3. So I finally just strongarmed it
with a --nodeps option:
rpm -Uvh --nodeps lyx-1.2.1-1.i386.rpm
That did it. It installed.
Lessons Learned
Procedures will vary from distro to distro, LyX version to LyX version,
so the preceding procedure means nothing to you unless you're trying to
install LyX 1.2.1 on a Mandrake 8.2 box. What you should take from my experience
instead is the process.
I read the LyX mailing list, gleaning information from various list
members' installation adventures. I read all the info on the LyX download
page, noting that because LyX uses an outdated xforms, they make the outdated
xforms available in the contrib section of their ftp site. Their contrib
section also contains other components that may or may not be necessary
for your particular installation.
Beyond that, you slowly, deliberately and intelligently use trial and
error. Try binary packages. Try rebuilding RPM packages with commands like
the following:
rpm --rebuild lyx-1.2.1-1.src.rpm
You might find it easier to recompile. Remember to find the right versions
of dependencies. Look in the LyX website's contrib directory, and look
at the documentation on the website's download page.
One more thing. Perusing the mailing lists, I've noticed that often
early adopters of LyX versions found either instability or minor missing
features. I installed 1.2.1 on my experimental machine. My daily driver
will stay with 1.1.6fix4 until I've verified that 1.2.1 works well and
can work with my "Troubleshooting
Techniques of the Successful Technologist" book.
LyX Documentation Resources
By Steve Litt
Microsoft made a name for themselves with menu driven software that could
be used without a manual. They traded flexibility for obviousness, which
works just fine for easy to moderate tasks. But LyX is made for heavy tasks,
like writing a book, and gives you unimaginable flexibility. LyX is no
MS Word -- you must read the documentation. LyX usage is a commitment,
not a dabble.
With LyX, if you want to have control over the look of your documents,
you must be accomplished at LyX. That means you must quickly pass through
the Newbie and Apprentice stages. Quickly passing through those stages
is the entire purpose of this Linux Productivity Magazine issue.
This article lists and describes the documentation resources you'll
need in order to use LyX to write books, articles, papers and slideshows
in environments where the LyX defaults are not good enough.
The following is a list of the major LyX documentation resources:
| Reference |
Location |
LyX |
LaTeX |
Details |
Intro.lyx
(Help->Introduction) |
/usr/share/lyx/doc/Intro.lyx |
Newbie |
n/a |
Broad and shallow overview of LyX |
Tutorial.lyx
(Help->Tutorial) |
/usr/share/lyx/doc/Tutorial.lyx |
Newbie |
n/a |
2 hour tutorial will answer many of your questions. Best
2 hours you can spend. |
UserGuide.lyx
(Help->User's Guide) |
/usr/share/lyx/doc/UserGuide.lyx |
Newbie
Apprentice |
n/a |
Detailed overview of LyX, its environment, its capabilities |
Extended.lyx
(Help->Extended Features) |
/usr/share/lyx/doc/Extended.lyx |
Apprentice |
n/a |
Lesser used LyX features, tips and tricks. Reading this
doc early can save a fortune in headscratching time later. |
Customization.lyx
(Help->Customizations) |
/usr/share/lyx/doc/Customization.lyx |
Apprentice |
n/a |
How to customize your LyX environment, as well as incorporating
third party improvements such as New Document Classes, Layouts, and Templates. |
Reference.lyx
(Help->Reference Manual) |
/usr/share/lyx/doc/Reference.lyx |
Apprentice |
n/a |
Complete list of LyX functions, and how to bind them
to menus, buttonbars, etc. |
FAQ.lyx
(Help->FAQ) |
/usr/share/lyx/doc/FAQ.lyx |
Newbie |
n/a |
Easy FAQ answers many newbie questions |
BUGS.lyx
(Help->Known Bugs) |
/usr/share/lyx/doc/BUGS.lyx |
Apprentice |
n/a |
List of known bugs. |
|
|
|
|
|
| LyX Quickstart |
http://www.troubleshooters.com/lpm/200210/200210.htm |
Newbie
Apprentice
Accomplished |
Apprentice
Accomplished |
Soup to nuts LyX familiarization tool |
Writing Self-Published
Books with Lyx |
http://www.troubleshooters.com/linux/lyx/index.htm |
Newbie
Apprentice
Accomplished |
Apprentice
Accomplished |
Newbie to expert LyX book writing tutorial |
KatSpace:
Using LyX For DTP |
http://katspace.net/lyx/lyxhow.shtml |
Apprentice
Accomplished |
Apprentice
Accomplished |
Kathryn Andersen's excellent solutions to real life LyX
problems, including .cls files and lots of problem-solving LaTeX |
| latex2e.dvi |
/usr/share/texmf/doc/latex/general/latex2e.dvi |
n/a |
Apprentice
Accomplished |
This is your best general purpose LaTeX reference. 60
pages of details on LaTeX commands, but not much explanation. This is a
reference for experts, not a learning tool. But if you're patient in your
experimentation, you can learn from it. Be aware that the table of contents
is at the end, so to look up a command go to the table of contents at the
end. |
| essential.dvi |
/usr/share/texmf/doc/latex/general/essential.dvi |
n/a |
Apprentice |
This is a must read LaTeX explanation suitable for an
apprentice level user. If you find yourself having misunderstandings about
LaTeX, reread this document. |
| guide.dvi |
/usr/share/texmf/doc/latex/general/guide.dvi |
n/a |
Apprentice
Accomplished |
Billed as "A LaTeX survival guide for UNIX systems",
this doc is mostly redundant. |
| lshort.dvi |
/usr/share/texmf/doc/latex/general/lshort.dvi |
n/a |
Apprentice
Accomplished |
The title is "The Not So Short Introduction to LaTeX2e
or LaTeX2e in 87 minutes". This is a sort of advanced LaTeX textbook that's
best read on a rainy Sunday afternoon. Read it when you get to the point
where you're making your own environments and you don't really understand
what you're doing. Reread this doc from time to time. The more expert you
become, the more valuable you'll find this document. |
| fancyhdr.dvi |
/usr/share/texmf/doc/latex/fancyhdr/fancyhdr.dvi |
n/a |
Apprentice
Accomplished |
Almost everything you could ever want to know about customizing
headers and footers, well explained and well organized. A must read! |
Class/package
documentation |
/usr/share/texmf/doc/latex/* |
n/a |
Apprentice
Accomplished |
This tree contains documentation for most document classes
and packages. It's a wishing well. Want to make slides? See the pdfslide
and seminar subdirectories. Want to print a booklet stapled in the middle?
See the booklet subdirectory. Want to typeset computer programs? See the
program subdirectory. Be sure to look in the styles subdirectory for information
on floats, fancybox, lastpage, soul (better underlining), and much, much
more. |
| LyX Tricks and Tips |
http://www.lyx.org/help/index.php3 |
Advanced |
Advanced |
Tons of tricks and sample code from Herbert Voss, one
of the premier authorities on LyX. Contains answers for many or most of
the questions you might have.
But it's not as organized as one would hope, and it's
mostly LaTeX with little info on how to integrate with LyX. I treat this
site as a reference for experts. |
| LyX Mailing List |
Sign up at
http://www.lyx.org/internet/mailing.php3 |
Newbie |
Advanced |
Great resource for newbie questions and advanced questions,
but sometimes misses the mark with intermediate questions. |
The following is a list of resources categorized by LaTeX vs. LyX, and
Newbie vs. Apprentice vs. Accomplished.
|
LyX |
LaTeX |
| Newbie |
The LyX mailing list
Intro.lyx (Help->Introduction)
Tutorial.lyx (Help->Tutorial)
FAQ.lyx (Help->FAQ) |
None! |
| Apprentice |
The LyX mailing list
Reference.lyx (Help->Customizations)
LyX Quickstart
(http://www.troubleshooters.com/lpm/200210/200210.htm)
Writing Self-Published Books with Lyx
(http://www.troubleshooters.com/linux/lyx/index.htm)
KatSpace Using LyX For DTP
(http://katspace.net/lyx/lyxhow.shtml)
Extended.lyx (Help->Extended Features)
BUGS.lyx(Help->Known Bugs) |
LyX Quickstart
(http://www.troubleshooters.com/lpm/200210/200210.htm)
Writing Self-Published Books with LyX
(http://www.troubleshooters.com/linux/lyx/index.htm)
KatSpace Using LyX For DTP
(http://katspace.net/lyx/lyxhow.shtml)
/usr/share/texmf/doc/latex/general/essential.dvi
The LyX mailing list |
| Accomplished |
The LyX mailing list
Extended.lyx
(Help->Extended Features) |
/usr/share/texmf/doc/latex/general/latex2e.dvi
/usr/share/texmf/doc/latex/general/guide.dvi
/usr/share/texmf/doc/latex/general/lshort.dvi
/usr/share/texmf/doc/latex/fancyhdr/fancyhdr.dvi
/usr/share/texmf/doc/latex/ subdirectories
The LyX mailing list
LyX Tricks and Tips
(http://www.lyx.org/help/index.php3) |
Your Documentation Strategy
Whether you're committed to LyX, or just evaluating, you must spend some
time learning. I'd recommend 1 or 2 work days. This isn't MS Word -- it's
a publishing tool that can turn out professional work ready for the printer.
The time you spend with introductory documentation and tutorials will more
than pay for itself by eliminating dead ends, which saves time if you're
committed, and helps you make the right decision if you're evaluating.
First, take 10 minutes to read the Introduction (Help->Introduction
at the LyX menu). That will give you a high level view -- almost an executive
summary.
Next, take the 2 hours necessary to complete the LyX tutorial (Help->Tutorial
at the LyX menu). Of course you'll be tempted to quit the tutorial and
try those features you "really need". Don't do that. Those needed features
are almost certainly doable with LyX, but if you skip the tutorial you
almost certainly won't see how to accomplish them, and won't even be in
a position to implement them if guided by someone on the LyX mailing list.
If you haven't yet, now sign up for the LyX mailing list. At least scan
every email, and make a note of what info is available. You'll probably
be using that info soon enough.
Now start dabbling with LyX, while at the same time going through this
document (the LyX Quickstart, http://www.troubleshooters.com/lpm/200210/200210.htm).
Go through all the articles and exercises. Soon you'll be confused with
the LaTeX code (or even worse, similarities and differences between LaTeX
and LyX code). When you start having LaTeX questions, prepare for some
serious reading.
There' s no use reading LaTeX documentation until you've seen LaTeX
in action and understand where it fits in the big picture. After performing
some of the exercises in this magazine, it's time for some heavy reading.
If you have a printer, I'd suggest you print the following four files:
-
/usr/share/texmf/doc/latex/general/essential.dvi
-
/usr/share/texmf/doc/latex/general/latex2e.dvi
-
/usr/share/texmf/doc/latex/general/lshort.dvi
-
/usr/share/texmf/doc/latex/fancyhdr/fancyhdr.dvi
Print dvi files with the following command:
dvips myfile.dvi
or
dvips -P printername myfile.dvi
You might wonder why you should print these files instead of looking at
them on the computer. The answer is these are substantial documents, and
it's easier to read them, and mark them up, on paper. Later, you'll want
to view these files online for reference purposes. Here are two commands
with which to view a .dvi file:
xdvi myfile.dvi
or
dvips -o ~/junk.ps latex2e.dvi; gv ~/junk.ps
The former command is easy, but you might not like the xdvi user interface.
If not, the latter command converts the .dvi to postscript and then views
it in the gv viewer. For easier printing and viewing, you might
want to convert all the files in directory /usr/share/texmf/doc/latex/general/
to postscript with dvips -o. You'll need to do it as root because
no other user has write rights to this directory.
First read essential.dvi, then latex2e.dvi. Go back
to your experimentation and your work with the LyX Quickstart (this file,
http://www.troubleshooters.com/lpm/200210/200210.htm).
Refer back to essential.dvi, then latex2e.dvi as
necessary. Ask questions on the LyX mailing list as necessary. If referred
to the LyX Tricks and Tips site (http://www.lyx.org/help/index.php3),
then go there, and while there, look around. It's a huge resource.
Once you've done some serious LyX, LaTeX, and LyX/LaTeX integration,
read lshort.dvi and fancyhdr.dvi, and really think about
what you're reading. As you read, you'll have many "eureka" breakthroughs,
and you'll start to understand the finer points.
Now go out and practice some more. You're fast becoming an accomplished
LyX user, and maybe even an expert.
Making a Book
By Steve Litt
In this exercise you'll learn to choose a document class. You'll learn
about the relationship between your document class and the available environments
(remember, that's LyXese for paragraph styles). You'll make a tiny book
and view it in Postscript. You'll manipulate the margins, and the interparagraph
spacing. You'll go beyond the defaults by indenting paragraphs AND giving
them a large skip. You'll change the book's default font size and typeface.
You'll customize the headers and footers. You'll use a little ERT to customize
the title page. And you'll structure your document into Parts, Chapters,
Sections, and Subsections.
Run LyX, and from the menu choose File->New to get a blank document.
LyX can create different types of documents, including books, articles,
reports, letters, resumes and many other document types. The default for
a new document is an article, or more specifically, the Article document
class. A document class is similar to a template in MS Word in that
it determines the available styles, and what they'll look like.
So the document on your screen is from the Article document class, and
you want to make a book. Do the following:
-
Layout->Document to access the Document Layout screen with the Document
tab active.
-
Notice that the radio buttons, labeled "Sides", on the right side of the
Document Layout screen, have "One", rather than "Two" checked. Remember
this.
-
Click the arrow next to the Class input box to access a list of document
classes
-
Pick book from the list, and notice that a confirmation window appears,
but it's buried under the list.
-
Drag the confirmation window from beneath the list and note that it looks
like the following:

-
Click the Yes button
What you've just done is chosen the book document class, so you now have
additional Environments such as Part, Chapter, and several others. When
you said "yes" to the question "Should I set some parameters to the defaults
of this document class?", what you did is allow LyX to change several defaults
to conform with a typical book. Look at the radio buttons called "Sides"
on the right side of the Document Layout screen now have "Two" checked.
This is one of the defaults changed by using the book document class.
Finally, click the OK button on the Document Layout screen so that you
return to LyX itself, and save your document. Now it's time to write your
book.
Writing the Book
Copy the text from booktext.htm to the edit
area of LyX. Then search for every paragraph beginning with an environment
name followed by a colon, and for each such paragraph, select the named
environment from the environment list (leftmost component on the buttonbar)
to change the environment. The finished document explains the process more
completely. Read its pdf file. You might also
like to see the raw LyX file.
Save the file frequently. When you're done, from the menu choose View->Postscript,
and note that you have a 13 page book with one part and four chapters.
Note that every chapter starts on an odd number page. This is configurable.
Notice also that odd number pages print more to the left than the even
number pages. This is exactly opposite of what you want, because in a bound
book, you need extra room, for the book's binding, on the left side of
odd pages and the right side of even pages. We'll fix that right now!
Setting the Margins
Layout->Document, click the Document tab and make sure that the right side
radio buttons are set for a 2 sided document. The fact that it's 2 sided
is what enables odd and even pages to have different margins.
Next click the Paper tab. It should look like the following:

No margins are set. The document printed with default margins. We're
going to change that. The first thing you want to do is click the "Use
Geometry Package" radio button right below the Papersize list button. Margins
can be set ONLY if you use the Geometry package. Fill in the following
margins:
-
Top: 1.5in
-
Bottom: 1.5in
-
Left: 4in
-
Right: 1.5in
Notice that in each field, we appended a unit (in, which stands for "inches").
Valid units include in, cm, ex, pt (points). These margins are shorter
from top to bottom, narrower from side to side, and hugely skewed away
from the book's binding. From the menu, choose View->Postscript and notice
the huge binding margin, and the fact that the document has expanded to
14 pages.
|
WARNING!
A very common error is forgetting the units on margins and other LyX
lengths. Doing so does not produce an error message, but instead the OK
and Apply buttons are grayed out until all lengths have units. We all assumed
this was a LyX bug the first time we used LyX.
So if your OK and Apply button are grayed out, check that all lengths
have units. |
Looking at the Paper tab, you see that you can modify the header and
footer margins or the paper size. The paper size can either be chosen from
the papersize list at the upper left, or by putting in custom measurements
in the width and height fields in the "Custom Papersize" section.
Now let's make the dimensions more realistic:
Top: 1in
Bottom: 1in
Left: 3in
Right: 1.5in
Click OK, then File-Save, View->Postscript, and notice that the document
has gotten shorter (should now be 13 pages), and it looks more normal.
|
NOTE:
When viewing postscript with View->Postscript, you might see the same
document as last time. If so, your postscript viewer should have a "Redisplay"
button or some other means of refreshing. Refresh it.
Note also that View->Postscript opens a new postscript viewer each time.
If you want to see your changes in the same postscript viewer, use View->Update->Postscript,
and your changes will be in the same viewer as previously. However, you'll
almost certainly need to refresh the viewer.
On some installations View->Update->Postscript fails. If so, use View->Postscript
and close old postscript viewers. |
That's it. You've just set the margins. Make a note of how many pages
your postscript view takes, and where the text ends on the last page, because
you're about to change the font and notice the changes.
Changing the Font
You're going to change two aspects of the document's font -- the typeface
and the size. Start by noticing the size and "look" of your current font,
and also how long the document is to the nearest 1/4 page. Now you'll change
it.
Layout->Document, click the Document tab, then click the Fonts list
area, and choose "newcent". This is the New Century Schoolbook font, one
of the most readable.
NowFile->Save and then View->Postscript (refresh if necessary). The
print should appear darker and clearer, and probably the document will
have become longer. The "newcent" typeface is an ideal one for books.
Now you'll experiment with font size. Click the Font Size list area,
and choose 12, which means 12 point. NowFile->Save and then View->Postscript
(refresh if necessary). Notice that the print has become larger, and the
document has become longer.
Changing the Paragraph Spacing and Indentation
If you look at the first page of chapter 1, you'll see that the first line
of each paragraph is indented, and there is no extra space between paragraphs.
We're going to change that to make a large space between paragraphs and
make the indentation even larger.
Layout->Document->Document tab. At the right toward the bottom you'll
see two mutually exclusive radio buttons called "Indent" and "Skip", with
the "Indent" button enabled. Click the "Skip" button, then click OK. File->Save
then View->Postscript and observe that now there's a space between paragraphs,
but the paragraphs are no longer indented. This happened because the Document
Layout screen incorporates skip and indentation as mutually exclusive,
although nothing in LaTeX makes them mutually exclusive. Later we'll enable
indent.
But first, let's increase the space between paragraphs. Look at the
postscript viewer and observe the space between paragraphs on the
first page of the first chapter. Now Layout->Document->Document tab->Default
Skip, and pick Bigskip. Click OK, File->Save, and then View->Postscript.
You'll see that the space between paragraphs has gotten bigger.
As mentioned, Skip and Indent are mutually exclusive on the Document
Layout screen, but nothing in LaTeX makes them mutually exclusive.
So we'll set the skip with a LaTeX command in the global part of the document.
In LaTeX (and LyX), the global part of the document is called the "Document
Preamble", so that's where we'll put the LaTeX command.
Layout->LaTeX Preamble, then type in the following LaTeX command:
\setlength{\parindent}{1in}
The preceding sets the length of document variable \parindent
to one inch. Now click the OK button, and File->Save, then View->Postscript,
and notice that your paragraphs are not only spaced widely, but also indented.
You might wonder how I knew the command \setlength{\parindent}{1in}.
I read about it in the lshort.dvi document. This is why I say
you should read the documents. This solution would have been difficult
to find without reading the documentation. There's no "point and click"
way to find it.
Other Document Layout Tabs
Before moving on to other things, let's examine the last three tabs on
the Document Layout screen. Layout->Document->Language tab, and note that
you can define the language (mostly for spellcheck reasons), the encoding,
and the quote style.
The Extra Tab
Click the Extra tab and you can define the float placement. This is a string
of letters that determine the the order in which you try to place a float
(floats contain images, tables or other entities).
The Section number depth sets how deep section numbers go. For instance,
the default is 2 for books, which means environments Section and Subsection
are numbered, but starting with Subsubsection, they are not. Setting it
to 1 would mean Section is numbered by Subsection is not. Setting it to
0 means Section is not numbered, but Chapter is. Setting it to -1 means
Chapter is not numbered.
Table of contents depth determines how deep the table of contents goes.
The book default setting of 2 lists all parts, chapters, sections and subsections.
This is a good level of detail, but it can go very long. Technical books
typically go this deep, but classic books go just to the chapter level
in the table of contents, which would be a contents depth of 0. Some technical
books have two tables of contents: One going very deep and the other shallow
for quick chapter lookup. While this is probably possible in LyX, it is
very inobvious, and beyond the scope of this document. This is the type
of question you'd ask on the LyX mailing list.
The PS driver list lets you choose from programs to render postscript.
If it works, don't change it. The "Use AMS Math" radio button determines
whether or not to use AMS Math in your math content. I'm not a math content
expert, so this is beyond the scope of this article.
The Bullets Tab
You use the Bullets tab to define which bullet types you want to show at
which levels for which purposes.
Making 2 Column Output
Humans read best when lines are less than 70 characters. At a 10 point
font and 8.5x11 paper, you'd need to set the margins very narrow -- to
maybe half the paper width, to do that. The classic way to make optimal
length lines without wasting paper is to use two columns.
Layout->Document->Document tab, and click the "Two" radio button in
the Page Cols area in the middle right of the Document Layout screen, and
then click OK. File->Save then View->Postscript, and observe you now have
two very skinny columns.
To optimize your document for two columns, you need to shrink the font
and widen the margins.
-
Layout->Document->Document tab->Font Size 10.
-
Layout->Paper, and then set your left margin to 1.5in and your right margin
to 0.8in.
-
Click OK to leave the Document Layout screen, then File->Save.
-
Layout->LaTeX Preamble, then change the 1in argument to 0.25in.
-
Click OK, then File->Save
-
View->Postscript and notice how much more readable your book is.
If you're like me, you'd like to see those columns a little farther apart.
Once again, this calls for LaTeX in the document preamble.
Layout->Document Preamble
Insert the following line:
\setlength{\columnsep}{1in}
Click OK, File->Save, View->Postscript, and note that the columns are 1
inch apart. Naturally, you'd want to reduce that number to maybe .3in,
but the 1 inch makes it obvious that it worked.
You might wonder how I found the right latex command. I'd like to tell
you that I found it in the documentation this magazine has mentioned, but
it's not (a grep command proves that). Speaking of grep, I'd like to tell
you that I found it with a grep command, but although a grep for the word
column led to "\twocolumn", further research led nowhere.
I guessed. Figuring there was a length variable that controlled column
separation, and knowing that many such lengths ended in the word "sep",
I tried the command and sure enough, it worked. Keep in mind this wasn't
the first thing I tried. It followed 1/2 hour of trial and error.
You would probably choose to ask this question on the LyX mailing list,
and you'd probably get the correct answer within a couple hours to a couple
days.
Summary
In a matter of minutes, you've created a new book, formatted it with the
correct environments, set the margins, changed the fontface and the font
size, changed paragraph spacing to skip instead of indent, and then restored
the indent with a LaTeX command in the document preamble. You reviewed
some of the other options on the Document Layout screen. You made your
document a two column document, and then widened the separation between
the column with a LaTeX command in the document preamble.
Hopefully you've observed that LyX can do almost anything, if you know
how to do it. And you've observed that some of the simplest things, such
as widening the column separation, can be obscure given the current state
of documentation. You've learned that a combination of knowing how to find
the right documentation, experimentation, and asking on the LyX mailing
list, usually yields the feature you want to incorporate.
This article detailed document formatting. The next article details
a few tasks that all writers perform.
Adding to Your Document
By Steve Litt
In the last exercise we pretty much beat up our LyX file. Now you should
start with a nice, clean version of that file. Right click HERE
to download it, and save it to your home directory. That will be the file
you use for this article's exercises, and will be called "your LyX document"
for the rest of this article.
Adding a Table of Contents
Open your LyX document in LyX. View->Postscript and view the documents
structure -- its chapters, sections, subsections, etc. Notice that there
is no table of contents.
In your LyX document, place the cursor at the very front of the first
Part environment ("Using this File"). Insert->Lists & TOC->Table of
Contents. A gray button labeled "Table of Contents" appears just above
the first Part environment.
Now View->Postscript, go to page 3, and you should see the table of
contents. But you might not. I've observed what appears to be an intermittent
anomoly in LyX 1.1.6Fix4 in which only the word "Contents" appears on page
3. I believe this is caused by the fact that you need two compiles -- one
to create an intermediate file and one to incorporate that intermediate
file into the contents. If this happens to you, simply make a small change
(add or delete a space at the end of a line) and once again View->Postscript.
You should now see the table of contents.
Because the procedure described in the preceding paragraph is a hassle
and can also lead to an inaccurate TOC if not checked carefully, the following
is a script that produces an accurate TOC every time:
#!/bin/bash
rm -f $1.aux
rm -f $1.dvi
rm -f $1.log
rm -f $1.ps
rm -f $1.tex
rm -f $1.toc
lyx --export latex $1.lyx
latex $1.tex
latex $1.tex
dvips -o $1.ps $1.dvi
gv $1.ps
|
The preceding script can be run from the command prompt, at any time
after saving the .lyx file, to produce an accurate postscript
document with an acccurate table of contents.
Adding a Graphic
A book with no graphics is pitiful indeed. Graphics are necessary for a
good book.
At least as late as LyX 1.1.6Fix4, it was bothersome to use graphics
other than .eps or .ps with LyX documents. Yes, it could
be done, I did it, but it was ugly. I've heard later versions are better
with non-postscript graphics, but this exercise uses a .eps graphic.
Right click THIS LINK to download a grayscale
encapsulated postscript screenshot of the Gimp main window, and save it
in your home directory. If you want to see the image, left click the link.
Now insert the graphic before the first paragraph of section 4.2. Cursor
to the start of first paragraph in section 4.2, and Insert->Figure, and
make sure "Encapsulated Postscript" is checked (not Inline EPS), and then
click the OK button. LyX will present the Figure dialog box. Leave everything
in the dialog box at its default. Click the Browse button, and browse to
the graphic you just downloaded. Now click the OK button, and watch the
figure appear in your LyX document.
|
NOTE:
The figure might not appear in your document. You might get just a box,
possibly containing some text saying the figure can't be rendered. This
is an intermittent anomoly in some versions of LyX, and it's not important,
because the output renders beautifully.
Even if it does render in LyX, the image will be grainy. Once again,
that's OK, because the final output will be a work of art. |
Now File->Save and View->Postscript, and observe that the monochrome
Gimp screenshot appears between the first and second paragraphs of chapter
1. This is the simplest way to insert a graphic, and with tiny graphics,
especially tiny graphics that must remain fixed in the text, this
is often the best way.
Unfortunately, if you insert a graphic this way (without benefit of
a float), the graphic cannot have a caption.
If you want to delete the graphic you just inserted, cursor to one side
of it, press the shift key, then use the cursor key to move across the
graphic. Now the graphic is highlighted. Now just delete it.
Adding a Graphic Inside a Float
The trouble with the figure insertion method in the preceding section
is that as graphics get bigger, placing them at an exact point in the text
might create large holes at the beginning or end of a page. It's often
more pleasing to place the graphic at the top or bottom of the page, or
even on an adjacent page. You can do this using floats.
When you use floats, the exact location of the graphic relative to the
paragraph explaining it is unknown. That means that text like "the preceding
figure" or "the following figure" is meaningless. You need a figure number.
Floats enable you to assign figure numbers.
|
WARNING!
According to some documentation, when crossreferencing a label of any
kind, you need to run latex2e before you can reference the label. My experience
has been that as long as I save the document, the new label is available
on cross reference lists. But if a label does not appear on the reference
list, try View->Postscript after saving the document. That will probably
cure the problem. |
Perform the following steps to implement a figure inside a float between
the first and second paragraphs of chapter 1:
-
Cursor to the start of the second paragraph of Chapter 1.
-
Insert->Floats->Figure Float Notice a figure float opens up, complete with
caption.
-
Insert->Label, and then type Gimp Screenshot and click OK. Notice that
a button with the words "Gimp Screenshot" appears.
-
To the immediate right of the new button, type "A screenshot of Gimp".
This will be the caption.
-
Cursor left so the cursor is before the button.
-
Press the Enter key once to open a new line above the caption.
-
Insert->Figure->Encapsulated Postscript to open the Figure dialog box.
-
Click the browse button, and navigate to the gimp Screenshot .eps you downloaded
from this page.
-
Click the OK button actuate your choice and dismiss the Figure dialog box.
-
Notice that the screenshot appears above the caption.
-
File->Save
-
View->Postscript and verify that the figure appears over a caption labeling
it as "Figure 1.1: A screenshot of Gimp".
Notice that the graphic does not appear between paragraphs 1 and 2, but
instead appears after paragraph 4, on the next page. So the question then
becomes, how does one refer to it in the text? Certainly the words "following"
and "preceding" are misleading when the graphic's location is decided by
LyX, not by you. The answer is you use a cross reference. Here's how:
-
Cursor to the end of the first paragraph in Chapter 1.
-
Press Enter, type the word "Figure" and then a space.
-
Insert->Cross reference
-
Pick "Gimp Screenshot" from the reference list. If you've followed the
directions exactly, it will be the only one.
-
In the "Reference type" list, pick TextRef
-
Click OK to record your choice and dismiss the Reference dialog box. Notice
there's now a button labeled "TextRef: Gimp Screenshot".
-
Type a space and the phrase "shows a screenshot of Gimp." to the right
of the the button.
-
File->Save, View->Postscript.
Notice that in the Postscript file the sentence now reads "Figure 1.1 on
the following page shows a screenshot of Gimp.". LyX figured out that the
graphic was on the next page.
Now, in LyX, copy that sentence to the beginning of Chapter 2 and also
to the very end of the document. File->Save, View->Postscript, and observe
the phrasing of the three sentences. Depending on the spacing of
the document, the Chapter 2 sentence will refer to the graphic as "on the
facing page" or "on the previous page", or something similar. The sentence
at the end of the document will simply refer to it by page number.
It's magic!
Changing the Float's Heuristic
Perhaps you didn't want the graphic on its own page following the page
of its insertion. Perhaps you want it at the top of the page of insertion,
or at the bottom of the page of insertion, or exactly where you inserted
it. You can ask LyX to try to accommodate you. Typically, LyX won't accommodate
you if it looks terrible.
You specify the heuristic by specifying a sequence of up to four of
the following letters: h, t, b, p. The sequence is optionally preceded
by an exclamation point, which means "try very hard to put it at my first
choice". The default heuristic is "tbp", which means try to put it at the
page's top, then try to put it at the page's bottom, and if neither works,
put it on a page of its own. Using "p" would put every graphic on its own
page. If you use h (here), it might as well be in front, because h always
takes precedence. To try very hard to put it inline with the text, use
"!hb", which says "try very hard to put it inline with the text, and if
not, try to put it at the bottom of the next page.
Let's try to make the graphic show up inline. Do the following:
-
Layout->Document->Extra tab
-
Type !hb in the Float Placement input area
-
Click OK to record your change and dismiss the Document Layout screen.
-
File->Save, View->Postscript
You'll notice that it makes no difference -- the graphic still goes on
the next page. But now try a smaller graphic. Download smallgraphic.eps,
click the Gimp screenshot, and switch the filename to smallgraphic.eps.
Now you get a small graphic that's easier for LyX to place. Now change
the Float Placement to tb, and it goes to the bottom. LyX couldn't
place it at the top. But I found that if I changed it to !tb so it would
try really hard to place it at the top, the graphic would go to the top.
Note that this Heuristic is global and can't easily be changed throughout
the document. Note also that this setting controls both figure floats and
table floats, which may not be what you want.
I sure wish they'd have an H letter, which would mean "put it here no
matter how awful it looks".
Adding a Cross Reference
Cross references allow one part of the text to reference another part of
the text by page number or by heading number. Typically you hard code the
name of the section, or the subject of the section, and then cross reference
to get the page and/or the section number. That way, when somebody moves
the text, the page numbering and section numbering are updated and stay
accurate in the reference.
Adding a cross reference is very similar to the figure float references
previously discussed. Try this exercise:
-
At the front of section 2.2 (Pasting Text), Insert->Label.
-
On the label input form, type "Pasting Text".
-
File->Save
-
Go to the end of the first paragraph of chapter 4, and press Enter to create
a new paragraph.
-
Type "As we discussed in section ".
-
Insert->Cross reference
-
On the reference screen, choose "Pasting Text", and choose "Ref" from the
Reference type list
-
Click OK to assert your choice and dismiss the Reference screen.
-
Type ": Pasting Text, "
-
Insert->Cross reference
-
On the reference screen, choose "Pasting Text", and choose "TextRef" from
the Reference type list
-
Click OK to assert your choice and dismiss the Reference screen.
-
Type ", text can be pasted."
-
File->Save, View->Postscript.
You'll see that the finished document says "As we discussed in section
2.2: Pasting Text, on page 9, text can be pasted". If your pagination is
different from mine, the page number will be different, but it will be
accurate in your document.
Inserting and Modifying a Table
Tables are tricky in LyX (at least up to and including 1.1.6Fix4). But
once you know the tricks of the trade, they're easy.
Start by inserting a table before the first paragraph of Chapter 1:
-
Cursor to the beginning of the first paragraph of Chapter 1
-
Insert->Tabular brings you to the Insert Tabular dialog box
-
Set the slides to 8 rows and 3 columns.
-
Click OK. You'll see an empty table appear at the start of the first paragraph.
-
Fill in the first two rows as follows. Copy and paste the long line so
it goes in as one line:
| Software |
OS's |
Details |
| LyX |
Linux, UNIX, BSD, Windows |
Styles based, complete layout and typesetting. All features except
character styles are fully supported, though the support mechanisms might
not be obvious. |
-
File->Save, View->Postscript, and note that the table walked right off
the edge of the page. That's no good!
LyX tables won't wordwrap unless you set the column widths. So we'll set
the column widths at 0.8in, 1.2in, and 3in for a total width of 5 inches.
Do the following:
-
Cursor to the top cell of the leftmost table column
-
Right click, click the column/row tab, and click inside the Width field
-
Type 0.8in
-
USER INTERFACE RARITY!!! Notice there is no OK button. You MUST press
the Enter key to record your choice. If you click the Close button before
pressing the Enter key, your change will not be saved!
-
Notice that when you press the Enter key, the leftmost column wordwraps.
-
Without closing the Tabular Layout dialog box, switch focus back to LyX,
and click in the top cell of the middle column
-
Switch focus back to the Tabular Layout dialog box, enter 1.2in in the
Width field, press the Enter key, and notice that the middle column wordwraps.
-
Without closing the Tabular Layout dialog box, switch focus back to LyX,
and click in the top cell of the rightmost column
-
Switch focus back to the Tabular Layout dialog box, enter 3in in the Width
field, press the Enter key, and notice that the right column wordwraps.
-
Click the Close button.
-
File->Save, View->Postscript
Notice how beautifully the table now renders. The one remaining glitch
is that the table is on the same line as the first paragraph of text. To
fix that cursor to the beginning of the first word of the first paragraph,
and press the Enter key. Now the first paragraph renders completely below
the table.
Go ahead and experiment by right clicking inside the table, and peruse
all the tabs of the Tabular Layout dialog box. You can set borders, append
and delete rows and columns, rotate the table 90 degrees or make it a special
"Longtable", and make cells multi-column.
Tables can be inserted inside Floats in the same way that graphics can.
Table floats have captions, and can be the basis of crossreferences, and
just like figure floats, their location in the rendered document is determined
by LyX, with the author setting the heuristics in the same way as with
a figure float.
Summary
In this article you inserted a graphic bare into the text, at which time
it was anchored to the text. Then you placed the graphic inside a figure
float, at which time the figure received a caption and a label which could
be crossreferenced. You learned how to adjust the heuristic that controls
the placement of the float. You learned how to use crossreferences, and
how to insert and modify a table.
At this point you're capable of writing a substantial LyX document,
as long as you're satisfied with the look and capabilities of the document
class you use.
Simulating Character Styles With
Color Pseudostyles
By Steve Litt
By far the most glaring omission in LyX is the lack of character styles.
Character styles are named styles that work on text within a paragraph,
instead of on a whole paragraph. For instance, you might have a special
appearance for names of baseball players, and a different special appearance
for the names of computer gurus, and no special appearance for other names.
So in Wordperfect or MS Word, you'd create a new style, declare it to be
a character style, and place the proper format codes within it. Then, every
time you write a baseball player's name, you'd choose the baseball style,
and the baseball player's name would be correctly formatted in the final
output. Once you've used this style, if you decided you wanted to change
the appearance of ALL baseball player's names, you would simply revise
the character style itself. WordPerfect has had this feature since 1988.
It's still missing in LyX.
This would be a showstopper if there weren't a workaround. This article
shows you the workaround, which is based on mapping colors to appearances.
If you use color based pseudostyles, when the LyX developers include this
badly needed feature, you can write scripts to convert colors to corresponding
genuine character styles, and thus maintain the structural integrity of
your book.
Remember 1981's war cry, "I want my MTV"? If you like LyX and want to
use it into the future, I'd suggest you get on the LyX list and yell "I
want my character styles". But in the meantime, here's the color pseudostyle
workaround.
First start with a fresh, clean document. Right click HERE
to download it, and save it to your home directory. That will be the file
you use for this article's exercises, and will be called "your LyX document"
for the rest of this article.
Layout->LaTeX Preamble, and insert the following code:
% %%% Pseudo character styles indexed by color %%%
\usepackage{ifthen}
\providecommand{\textcolor}[2]{#2}
\renewcommand{\textcolor}[2]{%
\ifthenelse{\equal{#1}{blue}}{{\textsl{\textsf{#2}}}}{}%      Baseball name
\ifthenelse{\equal{#1}{magenta}}{{\large{\texttt{#2}}}}{}%    Computer guru name
\ifthenelse{\equal{#1}{magenta}\or\equal{#1}{blue}}{}{#2}%    fallthrough
}
|
The preceding formats any blue text as slanted sans serif, and any magenta
text as large teletype.
Now place the following paragraph at the very end of the document. Be
sure to include the magenta and blue text:
| Barry Bonds and Sammy
Sosa are carrying on the slugging tradition of Babe
Ruth, Roger Maris and Mark
McGwire. But who is carrying on the tradition of Linus
Torvalds, Richard Stallman and Larry
Wall? Keep coding, and one day you might carry the eternal flame
of free software. |
Remember, you change text color by highlighting the text to change,
and then Layout->Character.
File->Save, View-Postscript, and notice that the baseball players are
slanted sans serif, while the computer gurus are large teletype.
Obviously color pseudostyles aren't what one has in mind when one imagines
character styles, but they allow us to use LyX until real character styles
become part of LyX. In the words of the Rolling Stones, "You can't always
get what you want, but if you try real hard, you just might find that ...
you get what you need!".
Making Your Own Layout
By Steve Litt
If you've gotten this far, you can use LyX to accomplish pretty much whatever
your chosen document class offers you. Sometimes that's enough. But if
you're self-publishing, or if you're writing an academic paper that is
required to be formatted "just so", or for whatever reason your format
is constrained by others, you'll need to change and/or add to what your
document class gives you. Basically, you'll need to build a new document
class based on the closest existing document class. Unfortunately, documentation
to accomplish this feat is rare, and most such documentation is inadequate.
That's one reason LyX has a reputation for difficulty.
This article describes how to build your own document class with minimal
pain. The hope is also to give you enough theory along the way that it
doesn't seem like arcane magic.
This article is for those wanting to improve on an existing document
class -- not build one for scratch. It's also not intended for those who
build a document class for distribution -- such a class would be delivered
as a style file, not a layout file. This article is for a real life LyX
user.
The Role of Layout Files
A layout file is one way to create a new document class. When you Edit->Reconfigure,
LyX scans certain directories for files ending in .layout, and
if it finds them, it incorporates the document classes of the .layout
files into the list of available document classes. The directories searched
for .layout files are typically /usr/share/lyx/layouts,
the system-wide layout repository, and $HOME/.lyx/layouts, the
user's repository for his own layouts. This article assembles the new .layout
file in $HOME/.lyx/layouts.
Layout File Hello World
You will now create a layout file which specifies a hellobook
document class that inherits all properties and behavior from the book
class, and in fact performs identically to the book class. Create
the following $HOME/.lyx/layouts/hello.layout file:
#% Do not delete the line below; configure depends on this
#  \DeclareLaTeXClass[book]{hellobook}
Input stdclass.inc
|
Line 1 is a pound sign followed by a comment. Remember, in LaTeX, anything
after a percent sign is a comment, including leading whitespace on the
next
line. Line 2 creates a new document class, called hellobook, that
is based on existing document class book. Line 3 imports all the standard
properties and behaviors needed by LyX. Save the file.
Now start LyX, File->New, Layout->Document->Document tab->Class list.
Scroll down the class list, and note that even though you already saved
your new .layout file, document class helloclass does not show
up in the list. That's as it should be.
Now Edit->Reconfigure. LyX tells you to quit LyX and start it again.
Do so. LyX, File->New, Layout->Document->Document tab->Class list. Scroll
down the class list, and you should see hellobook. Choose it, and when
you're asked whether to set defaults, say yes. Click the Environment list
box, and you'll see all the same environments as in the book class. You've
created a duplicate of the book class, and will do all your experimentation
in that duplicate. Read on...
A Layout Debugging Script
Unfortunately, LyX loads layout files when it starts up, and never again
checks to see whether the layout file has changed. That means that in order
to test a change to the layout file, you must exit LyX, start it again,
and View->Postscript. What a hassle!
So instead, make yourself a script that loops through closing LyX, opening
a new one, creating and viewing a postscript file. In this case, our script
never even starts the LyX user interface, but simply runs LyX with the
--export option to create a postscript file. Here's the debug script:
echo q to quit, e to edit in LyX, anything else to regenerate Postscript
read var
until test "$var" = "q"; do
        cd
        rm -f hello.ps
        echo; echo; echo; echo;
        if test "$var" = "e"; then
                lyx hello.lyx
        else
                lyx --export ps  hello.lyx
                gv hello.ps
        fi
        echo q to quit, e to edit in LyX, anything else to regenerate Postscript
        read var
done
|
Run the preceding script, and it repeatedly creates a new Postscript
file with a new LyX session, and shows you the results. Each time, after
you close the Postscript viewer, the script gives you a chance to edit
the file and continue the loop, continue to loop without editing, or quit.
Making a New Environment
It's now time to make a new Environment. We'll call the new environment
Story,
and it will be just like the Standard environment except it will be italic.
When making a new Environment, you make two different components. The
first is a 100% LaTeX description of the desired output, enclosed between
a LyX Preamble line and a LyX EndPreamble line. Once
again, this LaTeX code has NO EFFECT on how the environment looks in LyX,
and has TOTAL EFFECT on how it looks when rendered to DVI, Postscript or
PDF.
The other component is LyX code that defines how the environment looks
in LyX, and also contains a pointer to the LaTeX component. The LyX component
begins with a Style statement, and ends with an End statement.
The LaTeX component can be nested inside the LyX component, or it can
be separate. Generally speaking, if only one Environment uses the LaTeX
component, it's more readable to keep them nested. Remember, you can nest
the LaTeX inside the LyX, but not vice versa. LyX is a front end to LaTeX,
but LaTeX knows absolutely nothing about LyX.
The following is the code, which must be placed in $HOME/.lyx/layouts/hello.layout,
implements the Story environment:
Style Story
  LatexType             Environment
  LatexName             story_l
  ParSep                0.7

  Font
    Shape               Italic
  EndFont
  Preamble
        \newenvironment{story_l}
                {
                \itshape
                }
                {
                \par
                }
  EndPreamble
End
|
Here the LaTeX component, which is delimited by the Preamble and EndPreamble
LyX statements, is nested inside the LyX component. Let's start with the
logic of the LaTeX component.
The syntax for a LaTeX new environment statement is as follows:
\newenvironment{environment_name}{start_code}{end_code}
So at the start we tell the text to be italic, and at the end we tell it
to start a new paragraph (or else the next paragraph would be tacked on
to this one).
Now let's discuss the LyX code. It starts by declaring a style called
Story. The next line says this style is an environment. It could also be
a command, or other types of styles. The next line is a pointer to the
LaTeX environment to be implemented. You can think of this line as a pointer.
The next line declares that paragraphs of this type shall be separated
by 0.7. Without this line, successive Story paragraphs would be too close.
Note this affects the appearance in LyX only -- it does NOT affect the
final output.
The information between the Font and EndFont lines define how the font
looks in LyX, and should roughly match the final output.
Once again, remember that the preceding must be put in the .layout
file.
Symlinking the .layout File
For LyX to find it, the .layout file must be located in either
/usr/share/lyx/layouts
or $HOME/.lyx/layouts. These are a great place to put layouts
that relate to a large number of files in different projects, but not for
a layout specific to a single document. I try to keep a 1 to 1 relationship
between documents and layouts for the simple reason that I'd prefer documents
don't change their appearance unless I consciously change them. If I find
a better appearance in a new book, I don't necessarily want my older book
to change its number of pages.
In cases where you want a layout to stick with the document, it's best
to put the layout file in the same directory as the document, and then
place a symlink from a strategically named .layout file in $HOME/.lyx/layouts
to the actual layout file in your document's directory. That way the layout
file is safely grouped with its document, but LyX finds it.
So for instance, if I have a mybook.layout and a mybook.lyx
in the /books/mybook directory, I can symlink it as follows:
ln -s /books/mybook/mybook.layout $HOME/.lyx/layout/mybook.layout
You'll notice that the symlink name in the $HOME/.lyx/layout directory
is the same as the actual filename in the /books/mybook directory.
That is not absolutely necessary. You could have called the symlink whatever.layout:
ln -s /books/mybook/mybook.layout $HOME/.lyx/layout/whatever.layout
Your hellobook document class would have been detected in whatever.layout,
and everything would have worked fine. The only problem, and it's a small
one, is that if you look at your LyX file in a text editor, you would have
seen a line like this:
\textclass whatever
You might wonder what the heck "whatever" is, and you'd have to trace it
back to the filename of your symlink to your layout file. By keeping the
symlink name identical to the filename of the layout file, you're far more
likely to recognize and understand the source and meaning of the \textclass
line in your LyX file.
LyX Code vs. LaTeX Code
By Steve Litt
Before we go any further with layouts, you need to completely understand
that LyX code is totally different from LaTeX code, and yet in many cases
they look similar:
-
Generally, anything appearing in the .layout file between Preamble
and EndPreamble lines is LaTeX, and anything in the .layout
file not in a Preamble EndPreamble pair is LyX.
-
The Preamble and EndPreamble statements themselves are
LyX code.
-
You could theoretically place LyX statements between Preamble
and EndPreamble, but it's seldom done.
-
Anything appearing in the document body (in the LyX front end) that is
ERT (Evil Red Text, TeX mode) is LaTeX.
-
Anything appearing in Layout->Document preamble is LaTeX.
Confuse LyX and LaTeX and you'll have huge debugging tasks. Understand
the differences and others will marvel at your easy acquisition of LyX
skills. Here are some differences:
|
Distinctions between LyX code and LaTeX
code
|
| Trait |
LyX |
LaTeX |
Comment |
| Comment character |
# |
% |
This will get you every time! |
| Case sensitive? |
Mostly not |
Yes |
LyX environment names and references to names of LaTeX entities are
case sensitive. |
| Command structure |
Sometimes starts with a backslash |
ALWAYS starts with a backslash |
In the layout file, LyX commands starting with \ are always LaTeX,
AFAIK. |
|
LyX vs. LaTeX Font Traits
|
| Trait |
LyX |
LaTeX
(command
mode) |
LaTeX
(argument
mode) |
Default? |
| Family |
Roman |
\rmfamily |
\textrm{text} |
Default |
| |
Sans |
\sffamily |
\textsf{text} |
|
| |
Typewriter |
\ttfamily |
\texttt{text} |
|
| Series |
Medium |
\mdseries |
\textmf{text} |
Default |
| |
Bold |
\bfseries |
\textbf{text} |
|
| Shape |
Upright |
\upshape |
\textup{text} |
Default |
| |
Italic |
\itshape |
\textit{text} |
|
| |
Slanted |
\slshape |
\textsl{text} |
|
| |
Small Caps |
\scshape |
\textsc{text} |
|
| Size |
Tiny |
\tiny |
|
|
| |
Smallest |
\scriptsize |
|
|
| |
Smaller |
\footnotesize |
|
|
| |
Small |
\small |
|
|
| |
Normal |
\normalsize |
|
Default |
| |
Large |
\large |
|
|
| |
Larger |
\Large |
|
|
| |
Largest |
\LARGE |
|
|
| |
Huge |
\huge |
|
|
| |
Huger |
\Huge |
|
|
The following code shows all LyX code in red, and all LaTeX code in
green:
#% Do not delete the line below; configure depends on this
#  \DeclareLaTeXClass[book]{hellobook}
Input stdclass.inc

Preamble
% %%% Scratchpad variable for later use
\newlength{\scratchLength}%  scratch variable used later

% %%% Pseudo character styles indexed by color %%%
\usepackage{ifthen}
\renewcommand{\textcolor}[2]{%
\ifthenelse{\equal{#1}{blue}}{{\textsl{\textsf{#2}}}}{}%      Baseball name
\ifthenelse{\equal{#1}{magenta}}{{\large{\texttt{#2}}}}{}%    Computer guru name
\ifthenelse{\equal{#1}{magenta}\or\equal{#1}{blue}}{}{#2}%    fallthrough
}
EndPreamble

# %%% Story Environment
Style Story
  LatexType             Environment
  LatexName             story_l
  PARSEP                0.7

  Font
    Shape               Italic
  EndFont
  Preamble
        \newenvironment{story_l}
                {
                %comment
                \itshape
                }
                {
                \par
                }
  EndPreamble
End
|
If you want a nice, easy life in LyX, it's essential that you understand
the similarities and differences between LyX code and LaTeX code, and know
when to use each.
Expanding Your .layout
File
Let's take all the piecemeal work we've done to this point, and put it
into a real .layout file:
#% Do not delete the line below; configure depends on this
#  \DeclareLaTeXClass[book]{hellobook}
Input stdclass.inc

Preamble
% %%% Scratchpad variable for later use
\newlength{\scratchLength}%  scratch variable used later

% %%% Pseudo character styles indexed by color %%%
\usepackage{ifthen}
\renewcommand{\textcolor}[2]{%
\ifthenelse{\equal{#1}{blue}}{{\textsl{\textsf{#2}}}}{}%      Baseball name
\ifthenelse{\equal{#1}{magenta}}{{\large{\texttt{#2}}}}{}%    Computer guru name
\ifthenelse{\equal{#1}{magenta}\or\equal{#1}{blue}}{}{#2}%    fallthrough
}
EndPreamble

# %%% Story Environment
Style Story
  LatexType             Environment
  LatexName             story_l
  PARSEP                0.7

  Font
    Shape               Italic
  EndFont
  Preamble
        \newenvironment{story_l}
                {
                %comment
                \itshape
                }
                {
                \par
                }
  EndPreamble
End
|
The preceding layout code starts with the obligatory Latex Class declaration
and the importation of the stdclass.inc file. It then begins a
preamble, declares a length variable for future use, and implements the
color pseudostyles discussed earlier. Now that these pseudostyles are in
the .layout file there's no necessity to place the code in the
LyX LaTeX preamble. In fact, doing so would likely cause an error. Also,
please remember that once you implement color pseudostyles, your document
must have at least one instance of one of the declared colors.
Making a Note Environment
If you write technical books, you need to write tips, notes and warnings.
Sometimes these are placed as margin notes (and this is beyond the scope
of this Linux Productivity Magazine issue). But sometimes they're inline,
indented right and left, and either shaded, boxed, or both. Sort of like
this:
|
NOTE
This is an example of a typical note in a technical book. |
Shading and boxing are a little too complex for this article, so instead
we'll create the styles using horizontal lines top and bottom. It should
be indented about an inch on either side, and just for fun, let's make
it sans serif and ragged on the right (not justified to a constant right
margin). The code for the environment should be added to the bottom of
your existing .layout file created in previous exercises:
# %%% Note Environment
Style Note
  LatexType             Environment
  LatexName             note_l
  LabelType             Centered_Top_Environment
  LabelString           "NOTE"
  LeftMargin            MMMMM
  RightMargin           MMMMM
  ParIndent             MM
  TopSep                0.7
  ItemSep               0.7
  ParSep                0.7
  BottomSep             0.7
  Align                 Block
  AlignPossible         Block

  Font
   Family               Sans
   Shape                Upright
   Series               Medium
   Size                 Normal
  EndFont

  LabelFont
   Family               Sans
   Shape                Upright
   Series               Bold
   Size                 Largest
  EndFont


  Preamble
        \newenvironment{note_l}
                {
                \begin{list}{}
                        {
                        \setlength{\leftmargin}{1in}
                        \setlength{\rightmargin}{\leftmargin}
                        \setlength{\parindent}{0in}
                        \setlength{\parsep}{0.2in}
                        \itshape
                        }
                \item[]
                \hrulefill\\[-.4in]
                \center{NOTE}\\[.1in]
                \flushleft
                \raggedright
                }
                {
                \\
                \hrulefill
                \par
                \end{list}
                }
  EndPreamble
End
|
As mentioned earlier, creating such an environment requires a LyX environment
definition and a LaTeX environment definition, and a LatexName LyX statement
to link the two. The LaTeX environment definition resides between the Preamble
and EndPreamble LyX statements. We'll go through each section
line by line.
The LyX Section
The LyX section governs ONLY the appearance in the LyX user interface.
It does not effect the final (paper, pdf or postscript) output. LyX environment
properties are typically specified by key value pairs as appear in the
first column of the following table. Contrast this to the LaTeX section,
where environment properties are programmed procedurally with LaTeX commands.
The following table explains each line of the LyX section of the NOTE
environment definition:
|
|
| LatexType Environment |
Specifies that this is an environment, not a command or any other LaTeX
entity. |
| LatexName note_l |
This is the reference to the actual LaTeX code. |
LabelType
Centered_Top_Environment |
Specifies that within the LyX user interface, this environment will
have a label, and that label will be centered above the text. In fact,
for the Note environment, this label will be the constant string "NOTE". |
| LabelString "NOTE" |
Specifies that within the LyX user interface, the label to be "NOTE". |
| LeftMargin MMMMM |
Specifies that within the LyX user interface, the left margin is indented
the width of 5 upper case M characters. |
| RightMargin MMMMM |
Specifies that within the LyX user interface, the right margin is indented
the width of 5 upper case M characters. |
| ParIndent MM |
Specifies that within the LyX user interface, the first line of each
paragraph is indented the width of 2 upper case M characters. |
| TopSep 0.7 |
Specifies that within the LyX user interface, the start of the environment
is separated at least 0.7 units from the environment that came before it. |
| ItemSep 0.7 |
Specifies that within the LyX user interface, ????. |
| ParSep 0.7 |
Specifies that within the LyX user interface, the vertical space between
two paragraphs of this layout. |
| BottomSep 0.7 |
Specifies that within the LyX user interface, the end of the
environment is separated at least 0.7 units from the environment that comes
after it. |
| Align Block |
Specifies that within the LyX user interface, text of this environment
is aligned blockwise. |
| AlignPossible Block |
Specifies that within the LyX user interface, text of this environment
can only be aligned blockwise. |
Font
Family Sans
Shape Upright
Series Medium
Size Normal
EndFont |
Specifies that within the LyX user interface, the font for this environment
will be Sans Serif, normal size, non-bold, non-italic. |
LabelFont
Family Sans
Shape Upright
Series Bold
Size Largest
EndFont |
Specifies that within the LyX user interface, the label, which is the
word "NOTE", is Sans Serif, non-italic, bold, and 3 sizes bigger than normal
size. |
The LaTeX Section
The LaTeX section governs ONLY the appearance in the final output, be it
paper, pdf, Postscript or HTML. It does not effect the environment's appearance
within the LyX user interface. As a matter of fact, LaTeX does not know
of the existence of LyX. LaTeX environment properties are typically specified
by a combination of variable values and procedural commands.
The statement following the LyX Preamble statement is the first
LaTeX statement. The statement preceding the EndPreamble LyX statement
is the last LaTeX statement. LaTeX environment declaration syntax is as
follows:
\newenvironment{env_name}{prepended_commands}{appended_commands}
Thus, in the code, everything from \begin{list}{} to \raggedright
are prepended before the text formatted in this environment, and everything
from \\ through \end{list} is appended after the text
formatted in this environment.
For anything but the simplest LaTeX environments, the LaTeX must be
in a list context. I'm not enough of a guru to explain why, but basically
if you don't use the list context, typically not all the paragraphs of
the environment are formatted correctly. Typically the prepended material
is structured as follows:
\begin{list}{}{length_and_format_setting_statements}
\item[]
procedural_commands
You'll often need to experiment to get it just right.
The following table explains each line of the LaTeX section of the NOTE
environment definition:
|
|
| Preamble |
LyX statement declaring next statement to start the LaTeX preamble. |
| \newenvironment{note_l} |
Declare the environment and its name. Full syntax is
\newenvironment{env_name}{prepended_commands}{appended_commands}. |
| { |
Begins the prepended commands |
| \begin{list}{} |
Declares the list. Full syntax is \begin{list}{}{length_and_format_setting_statements} |
| { |
Begins the length and format setting statements |
| \setlength{\leftmargin}{1in} |
1 inch left margin |
| \setlength{\rightmargin}{\leftmargin} |
Make the right margin the same size as the left |
| \setlength{\parindent}{0in} |
The first line of paragraphs shall not be indented. |
| \setlength{\parsep}{0.2in} |
Adjacent paragraphs in this environment shall have 0.2 inches of vertical
separation. |
| \itshape |
The text shall be italicized. |
| } |
Ends the length and format setting statements |
| \item[] |
Declares an item |
| \hrulefill\\[-.4in] |
Draw a horizontal line margin to margin, and then linefeed, but make
the linefeed consume 0.4 inches less vertical space than it normally would.
This puts the word NOTE a pleasing distance from the top line. |
| \center{NOTE}\\[.1in] |
Center the word NOTE, linefeed, and skip an extra 0.1 inch. |
| \flushleft |
Make all the environment's text line up on the left margin. If you
did not insert this command, the centering of the word NOTE would carry
through all the paragraphs formatted in this environment. |
| \raggedright |
Don't space lines to equal length |
| } |
Ends the prepended commands |
| { |
Begins the appended commands |
| \\ |
New line |
| \hrulefill |
Draw a horizontal line |
| \par |
New paragraph so next environment starts at a new paragraph |
| \end{list} |
End the list started in the prepend section |
| } |
Ends the appended commands |
| EndPreamble |
LyX statement declaring preceding statement to be the last in the LaTeX
preamble. |
You probably won't get it right the first time, and might need to do
some debugging. Once again, here's the LyX layout debugging script:
echo q to quit, e to edit in LyX, anything else to regenerate Postscript
read var
until test "$var" = "q"; do
        cd
        rm -f hello.ps
        echo; echo; echo; echo;
        if test "$var" = "e"; then
                lyx hello.lyx
        else
                lyx --export ps  hello.lyx
                gv hello.ps
        fi
        echo q to quit, e to edit in LyX, anything else to regenerate Postscript
        read var
done
|
You can click here for a test LyX file.
Keep debugging your hello.layout file until the Postscript output
looks like this. To download the preceding
links, right click them and tell your browser to download them.
Conclusion
This article details the code necessary to implement a NOTE style. The
LyX and LaTeX code are clearly delineated, all code is explained, and you
are reminded that this code is placed as a unit in your .layout
file (the bottom of the .layout file is a safe place). In order
to see the effect of changes made to your .layout file, you must run a
new LyX session and remake the Postscript file. A script to do so repeatedly
is included in this article.
Beyond the learning discussed in the preceding paragraph, you also learned
a great deal of general knowledge about creating your own styles. You learned
the LaTeX code to make a typical environment, as well as the LyX statements
used to make the environment's LyX user interface resemble its final Postscript
output.
Changing Vertical Spacing
By Steve Litt
Right click and download this LyX file. View->Postscript
and note that the twenty items take up almost an entire page. For many
applications that's just too much, especially if there are many such lists
in your document and you're trying to keep your page count down. So what
we need to do is reduce the space between items in the Itemize environment
(because the items are formatted in the Itemize environment).
Our first step is to change this document from document type Article
to document type hellobook. Layout->Document->Document_tab->Class, and
pick hellobook. Now View->Postscript, and notice that although many things
change, such as the position of the page number, the list still takes up
most of a page. We need to reduce the inter item spacing, and we do that
by modifying
hellobook.layout.
Whenever you're changing an environment "just a little", LaTeX provides
a simple way to do it, that looks something like this, assuming the environment
you want to modify is called "mystyle":
\let\oldmystyle=\mystyle
\def\mystyle{
        \oldmystyle
        %%% Place LaTeX for modifications here
        }
In the preceding, note that the variable "oldmystyle" could be called anything,
or whatever, etc. Prepending the word "old" to the name of the original
style is simply a convention that makes this more readable.
Now let's add the following code to the bottom of hello.layout:
Preamble
\let\olditemize=\itemize
\def\itemize{
    \olditemize
    \setlength{\itemsep}{-1ex}
    }
EndPreamble
|
Save the file, and run the debug script discussed earlier in the magazine.
Notice the items are a little too close together, but the point is made.
You've pushed the items closer together. The one other point that's obvious
is that the items are closer together than the lines of a multiline item.
That's no good, and we'll fix it later. But let's first get a little more
space between items. Change the -1ex to -0.5ex, and iterate
the debug script again. Notice now the space between items is very pleasing,
and doesn't take up too much space.
But there's still a problem. The space between lines in a multiline
item is similar to the space between items. That's confusing to the reader.
We need to condense multiline items. To do that we'll use the setspace
package, and we'll invoke the setstretch command. The changes
are indicated in red below:
Preamble
\usepackage{setspace}
\let\olditemize=\itemize
\def\itemize{
    \olditemize
    \setlength{\itemsep}{-0.5ex}
    \setstretch{0.8}
    }
EndPreamble
|
Make those changes in your hellobook.layout file, and reiterate
your debug script.
Notice that now the items are too crammed together. It seems the setstretch{0.8}
condensed not only the multilines, but also the items. In fact, that command
set the vertical spacing for everything in the itemize environment to be
0.8. But remember, you can increase the \itemsep to add space
between items, but not inside them. Change its value to -0.0ex,
and re loop through the debug script. You should have a very pleasing list
whose items are easily discernible whether they're single line or multiline
items.
The following is the final style:
Preamble
\usepackage{setspace}
\let\olditemize=\itemize
\def\itemize{
    \olditemize
    \setlength{\itemsep}{-0.0ex}
    \setstretch{0.8}
    }
EndPreamble
|
Feel free to fine tune the various parameters to create a style whose
look and spacing suits you.
|
NOTE
This style change does not effect the environment's appearance within LyX.
Personally, I don't care. But if you really wanted to change the appearance
within LyX, you could do so using the techniques discussed in the Making
a Note Environment article. |
Changing the Enumerate Environment
Now, within LyX, highlight everything in the list, and change them from
the Itemize environment to the Enumerate environment, and redo the debug
script. Notice that now the list is numeric, and it has the same wide spacing
the Itemize environment had before you tweaked it. That's easy to fix.
Add the code marked in red:
Preamble
\usepackage{setspace}
\let\olditemize=\itemize
\def\itemize{
    \olditemize
    \setlength{\itemsep}{-0.0ex}
    \setstretch{0.8}
    }

\let\oldenumerate=\enumerate
\def\enumerate{
    \oldenumerate
    \setlength{\itemsep}{-0.0ex}
    \setstretch{0.8}
    }
EndPreamble
|
Vertically Condensing the Table of Contents
The other environment whose vertical spacing most folks consider excessive
is the environment for the table of contents. Unfortunately the table of
contents is incredibly complex, and there's no easy way to shrink it without
making some lines overwrite others. The problem is that the Table of Contents
command automagically spaces chapters farther apart than anything else,
and as far as my research has uncovered, you can't influence vertical spacing
in lower levels. Given that fact, and the fact that the Table of Contents
is used only once or twice, it's an excellent candidate for fine tuning
instead of a style modification. And make some compromises.
The first compromise is to shrink the font. That vertically condenses,
and also horizontally condenses to minimize confusing multiline Contents
entries. Then adjust the chapter spacing with the \parskip predefined
length. Naturally, you need to undo these adjustments after the contents.
Place the following TeX mode (ERT) BEFORE the contents button:
\footnotesize\addtolength{\parskip}{-0.5ex}
And to restore to normal, place the following AFTER the contents button:
\normalsize\addtolength{\parskip}{0.5ex}
The reason to use \addtolength{}{} instead of \setlength{}{}
is that the adjustment is relative to the current setting, so assuming
the reset is the negative of the original set, you're guaranteed the original
\parskip
after the contents. The reason it's reduced only 0.5ex is that more reduction
would cause lower level contents entries to touch.
A Condensed TOC Style
You might want a style to condense your TOC. This is normally overkill,
but if you need to do something else with your table of contents, it might
be appropriate. The following example not only vertically and horizontally
condenses, but also changes the contents header from "Contents" to "TABLE
OF CONTENTS":
\renewcommand\tableofcontents{
        {\LARGE\center{TABLE OF CONTENTS}}
        \par
        \begin{footnotesize}
        \addtolength{\parskip}{-0.5ex}
        \@starttoc{toc}%
        \addtolength{\parskip}{+0.5ex}
        \end{footnotesize}
        }
|
Creating a Condensed TOC Style From Scratch
Occasionally for some reason you might need to create a TOC style from
scratch, perhaps to do some incredibly intricate work on it. In that case
the best way to do it is to grep the .sty files in your LaTeX
tree to find a TOC style that you can copy and modify. In my book Troubleshooting
Techniques of the Successful Technologist I used a Contents style lifted
from the one in file /usr/share/texmf/tex/latex/base/book.cls.
The original looked like this:
\newcommand\tableofcontents{%
    \if@twocolumn
      \@restonecoltrue\onecolumn
    \else
      \@restonecolfalse
    \fi
    \chapter*{\contentsname
        \@mkboth{%
           \MakeUppercase\contentsname}{\MakeUppercase\contentsname}}%
    \@starttoc{toc}%
    \if@restonecol\twocolumn\fi
    }
|
After I got done changing it, it looked like this:
\renewcommand\tableofcontents{%
    \if@twocolumn
      \@restonecoltrue\onecolumn
    \else
      \@restonecolfalse
    \fi
    \chapter*{\contentsname
        \@mkboth{%
           \MakeUppercase\contentsname}{\MakeUppercase\contentsname}}%
    {
      \small\setlength{\parskip}{4pt}\setstretch{0.8}%
      \@starttoc{toc}%
    }
    \if@restonecol\twocolumn\fi
    }
|
Summary
You'll often find a need to change the vertical spacing of a style, especially
the Itemize and Enumerate environments, and the Table of Contents. It's
usually simplest to program only the modifications, rather than rewrite
the whole style. In the case of most environments, the way to do this is
to create a LaTeX environment looking something like this:
Preamble
\let\oldmystyle=\mystyle
\def\mystyle{
        \oldmystyle
        %%% Place LaTeX for modifications here
        }
EndPreamble
The preceding changes the output, but not the appearance within the LyX
environment. Usually changing it within the LyX environment isn't necessary
to the writer, but if it in your case it is, you can simply change or rewrite
the non-LaTeX portion of the environment.
Learning by Reverse Engineering
By Steve Litt
One way LyX Ninjas learn is by reverse engineering. The best way to explain
is by example. In the preceding article we saw that the following two LaTeX
lines are necessary to change line spacing:
\usepackage{setspace}
\setstretch{0.8}
How can you possibly know that? If it's documented, I have no idea where.
But you can find it by reverse engineering.
Start with hello.lyx. Layout->Document->Document tab->spacing,
and verify that it's "Single". Now File->Export->Latex to convert it to
LaTeX form in a file called hello.tex. Next, from a command prompt
rename hello.tex to a.tex. You've just created the baseline
document.
Now you'll create a document with fractional spacing. Layout->Document->Document
tab->spacing, and change it to "Other". Then, in the field to the right
of the "Spacing" list, type 0.8 and click the OK button. Now save
the document (File->Save), and then export again (File->Export->Latex),
and finally, from a command prompt rename hello.tex to b.tex.
You now have a LaTeX file created with single spacing, and another with
0.8 spacing. Find the differences:
[slitt@mydesk slitt]$ diff a.tex b.tex
9a10,11
> \usepackage{setspace}
> \setstretch{0.8}
[slitt@mydesk slitt]$
Pretty slick, huh? If you ever want the LaTeX code to use in a style, and
something similar exists anywhere in the Layout menu, you can often reverse
engineer to find the codes.
Headers and Footers
By Steve Litt
NOTE
This article is fairly advanced, and the section on putting Part info in
the header is definitely advanced. You need two pieces of documentation
to understand the exercises in this article:
-
/usr/share/texmf/doc/latex/fancyhdr/fancyhdr.dvi: Documentation on designing
your own headers with the fancyhdr package.
-
/usr/share/texmf/tex/latex/base/book.cls: the file that defines the Book
document class.
Other documentation such as lshort.dvi and latex2e.dvi are also useful
for the exercises in this article. |
Your LyX document automagically makes headers and footers based on a
page's part, chapter or whatever. On a quick and dirty document it's wonderful
not to have to worry about the headers, but on a more discerning document
you'll want to custom make the headers and footers. Luckily that's pretty
easy. Layout->Document->Document_tab->Pagestyle, and choose "Fancy". That
enables "fancy headings", which allows you complete control of the headers
and footers in your document. From there you hand code what you want.
Remember, to custom make your headers and footers, you MUST Layout->Document->Document_tab->Pagestyle,
and choose "Fancy".
|
NOTE
Actually, you can also place \usepackage{fancyhdr} and \pagestyle{fancy}
at the top of your LaTeX preamble or in your .layout file, but
Layout->Document->Document_tab->Pagestyle, and choosing "Fancy" does this
for you. |
\lhead et al
The simplest custom header and footer commands are the following:
| CODE |
FUNCTION |
| \lhead{Left Header Text} |
Left header, left justified |
| \chead{Center Header Text} |
Center header, centered |
| \rhead{Right Header Text} |
Right header, right justified |
| \lfoot{Left Footer Text} |
Left footer, left justified |
| \cfoot{Center Footer Text} |
Center footer, centered |
| \lfoot{Right Footer Text} |
Right footer, right justified |
The preceding override the default portion of the header. Also, note
that you can put almost any LaTeX commands in the text argument, so you
can incorporate various fonts, spacing, or even multiple lines (using \\).
\lhead and its friends are great for one sided documents, but
are inadequate for two sided documents because their placement cannot be
varied with odd or even pages. To work with two sided documents you use
the \fancyhf command...
\fancyhf
The syntax of \fancyhf is as follows:
\fancyhf[placement_list]{text}
The placement list is a list of places that particular text should be placed.
There are 2 x 2 x 3 = 12 places total:
-
(odd or even page) x (header or footer) x (left, center or right)
Each placement on the list is comprised of three letters built from the
following choices:
E
O |
Even
Odd |
H
F |
Header
Footer |
L
C
R |
Left
Center
Right |
Because the inside of a book is always left on odd pages and right on
even pages, and the outside is always right on odd pages and left on even
pages, the following LaTeX code prints an accurate diagnostic header and
footer:
\fancyhf{}
\fancyhf[ERH,OLH]{Inside Header}
\fancyhf[ELH,ORH]{Outside Header}
\fancyhf[ERF,OLF]{Inside Footer}
\fancyhf[ELF,ORF]{Outside Footer}
\fancyhf[ECH,OCH]{Center Header}
\fancyhf[ECF,OCF]{Center Footer}
|
If you'd like to try the preceding, Layout->LaTeX_Preamble, and paste
it in. As mentioned previously, you must Layout->Document->Document_tab->Pagestyle,
and choose "Fancy", or the preceding code will cause errors when you view
the document.
|
NOTE
There are also \fancyhead[placement_list]{text} and \fancyfoot[placement_list]{text},
which are the same as \fancyhf[placement_list]{text} except they have no
H or F in the placement list because they're specific to a header or footer.
I feel they're redundant, and in addition there be occasions where a
piece of text would appear in the header on odd pages and the footer on
even, or vice versa. |
Header and Footer Contents
Up to this point we've discussed the art of putting some trivial text in
the correct place, according to odd or even pages. And as you can imagine,
you can code fonts for the various headers and footers. But beyond that,
you can customize the headers according to page contents including the
page number, the chapter title and number, the section title and number,
and the subsection title and number, just to name a few.
Page Numbering
The page number is available from the \thepage macro. This macro
formats the page number as arabic or roman numerals, depending on whether
\pagenumbering{arabic}
or \pagenumbering{roman}. If you want go go against the grain
and show the numbers in a way that doesn't consider \pagenumbering{}
setting, then you can substitute \arabic{page} or \roman{page}.
However, keep in mind that if you fight the \pagenumbering{} setting,
the table of contents and index will format page numbers differently than
the headers or footers. This is not good.
So assuming a \pagenumbering{arabic} setting, here's how to
print large, bold page numbers on the bottom outside corner of every page:
\fancyhf[ELF,ORF]{\Large\bfseries\thepage}
Chapters and Sections
The default headers for the Book class have the Chapter number and title
on the inside (left on odd pages and right on even pages), and the Section
number and title on the outside. They're upper class and slanted text.
This layout is intolerable because on each page the Chapter and Section
information overwrite each other.
The default footer has the page number on the center of both even and
odd pages. This is OK, but it reduces the area available for content.
A better alternative is to place the page number on the outside header,
with the Chapter info on the inside of even pages, and the Section information
on the inside of odd pages. Because the page number is so small, there's
much less opportunity for collision. This can be done by inserting the
following code in your document's LaTeX preamble:
\renewcommand{\chaptermark}[1]{\markboth{\MakeUppercase{\slshape\chaptername{} \thechapter: #1}}{}}
\renewcommand{\sectionmark}[1]{\markright{\MakeUppercase{\slshape\thesection : #1}}}

\fancyhf{}
\fancyhf[OLH]{\rightmark}
\fancyhf[ERH]{\leftmark}
\fancyhf[ORH,ELH]{\thepage}
|
This is an improvement, but there's still risk of a collision. This
risk can be further reduced by removing the upper case from the header,
as follows:
\renewcommand{\chaptermark}[1]{\markboth{\slshape\chaptername{} \thechapter: #1}{}}
\renewcommand{\sectionmark}[1]{\markright{\slshape\thesection : #1}}

\fancyhf{}
\fancyhf[OLH]{\rightmark}
\fancyhf[ERH]{\leftmark}
\fancyhf[ORH,ELH]{\thepage}
|
To further remove the risk of collision you could slightly reduce the
size of the header:
\renewcommand{\chaptermark}[1]{\markboth{\small\slshape\chaptername{} \thechapter: #1}{}}
\renewcommand{\sectionmark}[1]{\markright{\small\slshape\thesection : #1}}

\fancyhf{}
\fancyhf[OLH]{\rightmark}
\fancyhf[ERH]{\leftmark}
\fancyhf[ORH,ELH]{\thepage}
|
Documentation file /usr/share/texmf/doc/latex/fancyhdr/fancyhdr.dvi
contains methods to completely eliminate the possibility of collision,
including putting the separate headers in wraparound boxes. Read it.
The following table describes the commands seen in the preceding code:
| COMMAND |
FUNCTION |
| \chaptermark |
This is called each time a new chapter is encountered. Its purpose
is to setting the left and right LaTeX marks to reflect the new chapter.
Arg 1 is the chapter title. |
| \sectionmark |
This is called each time a new section is encountered. Its purpose
is to setting the left and right LaTeX marks to reflect the new section.
Arg 1 is the section title. |
| \rightmark |
Prints the right LaTeX mark. Note that the right LaTeX mark is simply
a variable that can be used anywhere, including a left or central header
or footer. |
| \leftmark |
Prints the left LaTeX mark. Note that the right LaTeX mark is simply
a variable that can be used anywhere, including a right or central header
or footer. |
| \markboth{leftMarkText}{rightMarkText} |
Sets both the left and right LaTeX marks |
| \markright{rightMarkText} |
Sets only the right LaTeX mark, leaving the left LaTeX mark alone.
Note that there is NO \markleft, so the left LaTeX mark must have been
previously set with a \markboth. |
| \chaptername |
Prints the word "Chapter", or if the document is a different language,
the analogous word in that language. |
| \thechapter |
The chapter number |
| \thesection |
The section number |
| #1 |
The first argument. In the case of \markboth and \markright, the first
argument, as passed by the chapter or section code, is always the title
of the chapter or section. |
| \MakeUppercase{text} |
Converts the text argument to upper case. |
| \slshape |
Slanted font |
Post Graduate Work: Part and Chapter Headers
Let's say you wanted to format your headers the way "For Dummies", "Unleashed",
and "Idiots Guide" books do. These books have the part number and part
title on the left header of even pages, and the chapter number and chapter
title on the right header of odd pages, so that when you have the book
open, the Part info is on the extreme left and the Chapter info is on the
extreme right. It's a good way to format headers, although it should be
pointed out that this formatting is not ubiquitous -- O'Reilly and
"Special Edition Using" books don't header the Part info.
But let's say you do want to header the Part info. After reading the
previous sections of this article you might think that you could do something
like this:
|
WRONG!
|
\renewcommand{\partmark}[1]{\markboth{Part \thepart : #1}{}}
\renewcommand{\chaptermark}[1]{\markright{\chaptername{} \thechapter{} #1}}
|
If you insert this in your LaTeX Preamble, upon View->Postscript you'll
get errors. There's no such thing as \partmark, because it isn't
defined in book.cls. Nor can you simply create a new \partmark,
because even if that command existed, the book's Parts don't call it. Chapters
call \chaptermark, but Parts don't call \partmark or
anything else. A quick look in /usr/share/texmf/tex/latex/base/book.cls
will convince you of that. So we need to modify book.cls. But
we're going to modify it in a way that would make any OOP programmer or
C callback function jockey envious. We'll not touch the code inside book.cls,
but instead will, for want of a better word, "subclass" it inside our document's
LaTeX preamble.
The first step is to see how Chapters call \chaptermark so
that we can emulate that behavior with Parts. Looking in book.cls
you can observe that the command that calls \chaptermark is one
called \@chapter, and its definition begins like this:
\def\@chapter[#1]#2{
Looking through the book.cls code you can clearly see an equivalent
\@part
command, but that command does not call anything similar to \chaptermark
that could be used as a callback function (if LaTeX were C, \chaptermark
would definitely be a callback function). So basically, we need to redefine
\@part,
making exactly one change -- a call to \partmark.
So first we must define \partmark, then we must REdefine \@part,
and then the new \partmark command will format the header as desired.
Here's the code:
\newcommand{\partmark}[1]{\markboth{Part \thepart : #1}{}}
\let\oldpart=\@part
\def\@part[#1]#2{\oldpart [#1]{#2}\partmark{#1}}
\renewcommand{\chaptermark}[1]{\markright{\chaptername{} \thechapter{} #1}}
\renewcommand{\sectionmark}[1]{}

\fancyhf{}
\fancyhf[ORH]{\rightmark}
\fancyhf[ELH]{\leftmark}
\fancyhf[ERH,OLH]{\thepage}
|
The first line is just like the \renewcommand\chaptermark we've
seen before, except that because it doesn't already exist we use \newcommand
instead of \renewcommand. This line simply creates a blank \rightmark
and a Part Part#: PartTitle \leftmark.
The second line saves the original \@part, as \oldpart,
command for later use.
The third line basically subclasses the original \@part. It
runs the original (as \oldpart) with the original arguments, and
then calls \partmark with arg1. So this line has added a call
to \partmark to the original \@part command.
The fourth line is what we've seen before -- we set \rightmark
to the chapter information.
The final three lines simply assign \rightmark (the Chapter
info) to the odd right header, and \leftmark (the Part info) to
the even left header.
The result is exactly what we want -- Part information on the left top
of even pages, and Chapter information on the top right of even pages.
How I Figured this Out
You might be wondering how I came up with this solution. After all, as
a LyX user you want to know how to figure things out without being totally
dependent on the mailing list or on me (I won't answer any Email questions
about LyX unless they involve errors in this magazine or better ways to
do what I've done). If you can follow my thought processes in coming up
with this solution, you can solve many LyX problems for yourself.
As far as I can see there's nothing like it in the LyX documentation.
I didn't look on the LyX website, nor did I ask anyone on the LyX mailing
list or anywhere else. What I used was good, old fashioned Rapid
Learning.
First, I was familiar with the Chapter header methods using \chaptermark.
Although I hadn't looked it up, I knew \chaptermark was defined
in the Chapter code such that each new Chapter made a call to \chaptermark
with the chapter title for an argument.
My first attempt was this:
\renewcommand{\partmark}[1]{\markboth{Part \thepart : #1}{}}
\renewcommand{\chaptermark}[1]{\markright{\chaptername{} \thechapter{} #1}}
It errored out saying there's no such command as \partmark. A
quick search of book.cls verified that. So I searched book.cls
for \chaptermark and found it in the \@chapter command.
I figured if there was a callback routine that could be used to set the
LaTeX marking, it would be in the \@part command. Looking in the
\@part
command I verified there was no call to \partmark or anything
else that new parts could use as a callback routine to load the left and
right marks. In order to make a Part parallel to the Chapter mark setting
mechanism, it was obvious I'd need to do two things:
-
Make a \partmark command that paralleled the construction and
function of \chaptermark.
-
Modify \@part to call \partmark.
Naturally I didn't want to do this work in the existing book.cls.
That's all tested code, and I don't want to risk creating side effects.
There might be dozens of ways to make the modification within the document's
LaTeX preamble, but there's one code riff used constantly in LyX to modify
an existing command:
\let\oldmystyle=\mystyle
\def\mystyle{
        \oldmystyle
        %%% Place LaTeX for modifications here
        }
Now the experimentation began. I tried \def, I tried \renewcommand,
but I kept getting error messages. Most of the error messages concerned
the fact that the new command was defined differently from the old, so
I tried different syntaxes with square brackets and curly braces til I
got it right:
\let\oldpart=\@part
\def\@part[#1]#2{\oldpart [#1]{#2}\partmark{#1}}
Creating the \partmark command was trivial -- it was simply a
clone of a typical \chaptermark command, but with \newcommand
instead of \renewcommand because the command was not previously
defined.
So take a look at my thought processes, and when confronted with a tough
LaTeX problem, try to follow similar thought processes.
Odds and Ends
By Steve Litt
This article contains miscellaneous facts not discussed in the previous
articles.
Scoping Attributes
Let's say you want a part of your style to have tiny print without affecting
other text within or outside of the style. Of course, you could strongarm
it:
\tiny This is tiny.\normalsize
The problem with the preceding is this: What if the font going into this
LaTeX was not normalsize, but instead was Huge? All following
text will be normalsize instead of the intended Huge.
That's no good at all.
If the text meant to be tiny is short, by far the easiest way is by
placing the command and the text within braces:
{\tiny This is tiny.}
In the preceding, only the text within the braces will be effected by the
\tiny
command, reverting to the original size after the brace. That's excellent,
but what happens if you need six paragraphs to be tiny? You don't want
six paragraphs of Evil Red Text. And don't even think about making
an ERT {\tiny and then an ERT } six paragraphs
later. It won't work.
Instead, at the start of your six paragraphs, place an ERT \begin{tiny}
and at the end, place an ERT \end{tiny}. This is like a begin
tag and end tag in HTML, and works exactly how you would hope. As an added
advantage, because it is delimited by braces, it preserves any spacing
you place in the document.
The \begin and \end commands are often used in environments.
Typically the \begin occurs in the prepend section, and the \end
occurs in the append section. This is usually the simplest method
for assigning an attribute to an environment and guaranteeing that the
original attributes will be in place when the environment ends.
|
WARNING
In the preceding paragraph, note that the "tiny" in braces does NOT start
with a backslash!!! When using \begin and \end, what
you place in the braces is the command name WITHOUT the backslash. If you
have problems compiling (viewing) after using \begin and
\end,
be sure to check whether you accidentally used the backslash. |
Some commands take an argument. Those commands scope the argument. So
for instance, you can make a phrase small caps like this:
\textsc{This Is Small Caps}
Commands that take arguments cannot be used with \begin and \end. However,
many such commands have non-argument equivalents. For instance, \scshape
is the non-argument equivalent of \textsc, so the following is
equivalent to the \textsc version:
\begin{scshape}This Is Small Caps/end{scshape}
Separating Commands from Text
The easiest way to separate commands from text is with a space, like this:
\tiny this is tiny.\normalsize
The spaces are considered part of the command and not printed in the document.
If you really need those spaces to print, do this:
\tiny{} this is tiny\normalsize{}
The preceding includes the space before the word "this" because the dummy
{}
pair ends the command. And because a dummy {} pair ends the \normalsize
command, the any space you place after that command will print.
\small this is small\small
Installing a Package or Class
File
There's a website called CTAN (www.ctan.org) containing a gold mine of
packages and class files for every occasion. Becoming familiar with CTAN
helps avoid reinventing the wheel. You'll also learn about packages and
class files on the LyX mailing list. Here are the basic steps to installing
a package or class file:
-
Download the .cls or .sty file.
-
Place the file somewhere within the /usr/share/texmf/tex/ tree.
You might want to create a /usr/share/texmf/tex/latex/local directory
so that you can keep your downloaded packages separate from those that
were installed with your LaTeX installation. You might want to keep homegrown
.cls
or .sty files in directories outside that tree, and use symbolic
links between that directory and those files. Whatever works.
-
Run the texhash program with no arguments. This tells the LaTeX
system that these packages and class files are now available.
-
Let LyX know about the new package or class file with the Edit->Reconfigure
command, and then close LyX and restart.
-
Notice the name of the package or class file. The name of a package is
the first argument of the .sty file's \ProvidesPackage{}
command. The name of a class file is contained in the .cls file's
\ProvidesClass{}
command.
-
In the case of a class file, open a new or existing document, and Layout->Document->Document_tab->Document_class,
and choose the name derived in the preceding step. In the case of a package
file, place the following in your document's document preamble, or in its
.layout file:
-
\usepackage{mypackage}
where mypackage is the name derived from the package file's
\ProvidesClass{}
command.
-
Freely use the environments and commands from the package or class file.
Making Your Own Packages and Class Files
This magazine emphasized making .layout files. This is great when you make
a new .layout file for each document, but sooner or later you
might want to package your styles for all your documents, or even for those
of many other people. Some brief instructions are included in lshort.dvi.,
which is available on your computer (use the locate command to
find it). Voluminous and complete documentation on styles and packages
are contained in clsguide.dvi, also available on your computer
(use the locate command to find it).
The rule of thumb is that you make a package file (whatever.sty)
if the commands and environments you're defining could be used with any
document class. For instance, one might want to make a Note package which
defines the Note, Tip and Warning environment for any class.
Use a class file (whatever.cls) to define a single, specific
class. For instance, the Hellobook document class could have been implemented
as a class file. I used a .layout file because I anticipated that
the document class would have a one to one relationship with its document.
But if you want a document class shared across many users and documents,
make it a class file.
The aforementioned documentation tells you everything you need to know
about creating packages and classes. Once you've created your package or
class, use the instructions in the Installing
a Package or Class File section of this article.
Outlining in LyX
Unfortunately, LyX has no outliner or outline mode. Fortunately, you can
use the VimOutliner outline processor, and then use the otl2lyx.vim
script to install that outline as the structure of a LyX document. See
the accompanying documentation.
Making Slides in LyX
You can make outstanding slideshows in LyX. See /usr/share/texmf/doc/latex/pdfslide/*
and usr/share/texmf/doc/latex/pdfslide/*. Also go to www.ctan.org
and search for keyword "slides", paying particular attention to the prosper
and foiltex packages.
Life After Windows: You Get What You Pay
For
Life After Windows is a regular Linux Productivity Magazine column,
by Steve Litt, bringing you observations and tips subsequent to Troubleshooters.Com's
Windows to Linux conversion.
By Steve Litt
I've gotten pretty jaded. When I buy a computer there's no software expense
added in. I can buy a Barebones box, load it up, and have a respectable
computer for less than $500.00.
"But wait", says the Windows advocate. "I can buy a respectable computer
for $500.00 too! Where's the Linux saving?".
The Windows advocate is right. Microsoft's OEM Windows license is so
cheap that it's more than offset by the economies of scale of Dell, Gateway,
Compaq, HP, and the big and medium whitebox vendors. The Windows advocate
might mention that "you get what you pay for".
And the Windows advocate would be absolutely right. You get what you
pay for. More on that later.
To compete with Linux, especially in these days of the quality $400.00
box, Microsoft has had to cut the OEM license price to the bone. This is
a problem for Microsoft, because they need to make their profit somewhere.
If not the OEM Windows license, then where?
I wonder how much Microsoft makes on their new "anti-piracy" measures?
How many people get so fed up trying to fix their computer with the "recovery
disk" packaged with an OEM system that they simply buy a fully licensed
copy for what, $200.00? Will Microsoft later use their mandatory registration
as a profit center? "I'm sorry sir, our records show more than 3 reinstalls
on your computer, so you'll need to buy our reinstallation 5 pack". Don't
think it can happen? Five years ago, did you ever dream you could buy a
piece of software and have the vendor control your installation?
Another profit center for Microsoft is the apps they don't include:
| On Linux Install Disk |
Windows Substitutes |
| OpenOffice (free)** |
MS Office (hundreds) |
| LyX (free) |
Desktop publisher software (hundreds) * |
| GCC (free) |
MS Visual C++ (hundreds) |
| Gimp (free) |
Photoshop (hundreds) * |
| Vim (free) or Emacs (free) |
MultiEdit(hundreds)*, others (varying prices)* |
* Not a Microsoft Product
** Not on all Linux distributions, but freely downloadable |
Microsoft's site lists the price of the full version of Office XP Suite,
Standard Edition as $479 US. So if you need an office suite, your $500
box just skyrocketed to $979. Of course, many folks say "I'll just copy
it". That's efficient if you get away with it, but if the software police
audit you it could boost your $500 box to $150500 (one hundred fifty thousand,
five hundred dollars).
The only C++ I could find on Microsoft's website is Visual C++ .NET.
The cheapest edition is the Professional Edition, which sells for $1,079
US full version. Ouch!
Meanwhile, when you obtain a Linux distro, you get literally hundreds
of pieces of software -- desktop, server, development, scientific, financial,
games, and tons of others. Naturally you won't use all of them, but almost
anything you want to do is doable by software packaged with your Linux
installation CD set. And if you can't find it there, you'll almost certainly
be able to download it. Considering the costs for alternatives to this
free software (free both as beer and as speech), that Windows box starts
looking expensive indeed.
Now of course you and I know that almost all the Open Source tools have
been ported to Windows, so it's not necessary to pay these prices. But
somehow, doesn't it seem like when people use Windows, they end up buying
the commercial software?
The Windows advocates are right -- you get what you pay for. The OEM
Windows license is artificially low to compete with Linux. And if you buy
it, you get what you pay for. You live with huge software costs, uncertain
ability to reinstall, increased virus risk, the need to buy an antivirus
program, and vendor lockin.
So when buying a computer, don't just look at Windows' cheap purchase
price. Look at the total cost of ownership. After all, you get what you
pay for.
Steve Litt is the author of the course
on the Universal Troubleshooting Process. He can be reached at Steve Litt's email address
.
Letters to the Editor
All letters become the property of the publisher (Steve Litt), and may
be edited for clarity or brevity. We especially welcome additions, clarifications,
corrections or flames from vendors whose products have been reviewed in
this magazine. We reserve the right to not publish letters we deem
in bad taste (bad language, obscenity, hate, lewd, violence, etc.).
Submit letters to the editor to Steve Litt's email address, and be sure
the subject reads "Letter to the Editor". We regret that we cannot return
your letter, so please make a copy of it for future reference.
How to Submit an Article
We anticipate two to five articles per issue, with issues coming out monthly.
We look for articles that pertain to the Linux or Open Source. This can
be done as an essay, with humor, with a case study, or some other literary
device. A Troubleshooting poem would be nice. Submissions may mention a
specific product, but must be useful without the purchase of that product.
Content must greatly overpower advertising. Submissions should be between
250 and 2000 words long.
Any article submitted to Linux Productivity Magazine must be licensed
with the Open Publication License, which you can view at http://opencontent.org/openpub/.
At your option you may elect the option to prohibit substantive modifications.
However, in order to publish your article in Linux Productivity Magazine,
you must decline the option to prohibit commercial use, because Linux Productivity
Magazine is a commercial publication.
Obviously, you must be the copyright holder and must be legally able
to so license the article. We do not currently pay for articles.
Troubleshooters.Com reserves the right to edit any submission for clarity
or brevity, within the scope of the Open Publication License. If you elect
to prohibit substantive modifications, we may elect to place editors notes
outside of your material, or reject the submission, or send it back for
modification. Any published article will include a two sentence description
of the author, a hypertext link to his or her email, and a phone number
if desired. Upon request, we will include a hypertext link, at the end
of the magazine issue, to the author's website, providing that website
meets the Troubleshooters.Com criteria for
links and that the author's website first links to Troubleshooters.Com.
Authors: please understand we can't place hyperlinks inside articles. If
we did, only the first article would be read, and we can't place every
article first.
Submissions should be emailed to Steve Litt's email address, with subject
line Article Submission. The first paragraph of your message should read
as follows (unless other arrangements are previously made in writing):
Copyright (c) 2001 by <your name>. This material
may be distributed only subject to the terms and conditions set forth in
the Open Publication License, version Draft v1.0, 8 June 1999 (Available
at http://www.troubleshooters.com/openpub04.txt/ (wordwrapped for readability
at http://www.troubleshooters.com/openpub04_wrapped.txt). The latest version
is presently available at http://www.opencontent.org/openpub/).
Open Publication License Option A [ is | is not] elected,
so this document [may | may not] be modified. Option B is not elected,
so this material may be published for commercial purposes.
After that paragraph, write the title, text of the article, and a two
sentence description of the author.
Why not Draft v1.0, 8 June 1999 OR LATER
The Open Publication License recommends using the word "or later" to describe
the version of the license. That is unacceptable for Troubleshooting Professional
Magazine because we do not know the provisions of that newer version, so
it makes no sense to commit to it. We all hope later versions will be better,
but there's always a chance that leadership will change. We cannot take
the chance that the disclaimer of warranty will be dropped in a later version.
Trademarks
All trademarks are the property of their respective owners. Troubleshooters.Com
(R) is a registered trademark of Steve Litt.
URLs Mentioned in this Issue